In the building manual for the PT 11 it says: "The PT 11 sailing rig is designed to be light and easy to use, not to be bullet proof." In developing this rig, weight and ease of use were the biggest priorities. "Hiking (sitting on the rail and leaning out) is okay for one person to do but not two. Sailing with two and having one person hiking and the other sitting inside is okay too, just not two sitting on the rail."
The PT 11 sailing rig arrives ready to use with all of its running rigging. One small item is up to you and that is the traveler line. This is the line needed to clip your main sheet to.
You can tie a line with a little slack, using the existing holes on the transom inwale to clip your main sheet onto that. This self steering blog post shows this method.
The traveler can be be made shorter as shown below by drilling holes about 7" from the centerline (14" apart). We drilled 5/16" holes and then applied a few coats of epoxy to the walls of the holes to seal the plywood.
The traveler line can be around 3/16 diameter and be held with stopper knots underneath the inwale.
A short PT 11 travelerThis image shows the tiller/hiking stick in the self-steering position. This is good for brief periods and works best when going upwind and only works when the boat is heeled.
When sailing, if you feel resistance on the tiller, check to see if the rudder is completely down or if you have caught kelp or other debris. Keeping the threads in the knob clean and greased is important. The threads in the knob are brass and the pin is stainless steel so it will corrode. A bit of maintenance will insure the knob does its job and keeps the rudder down.
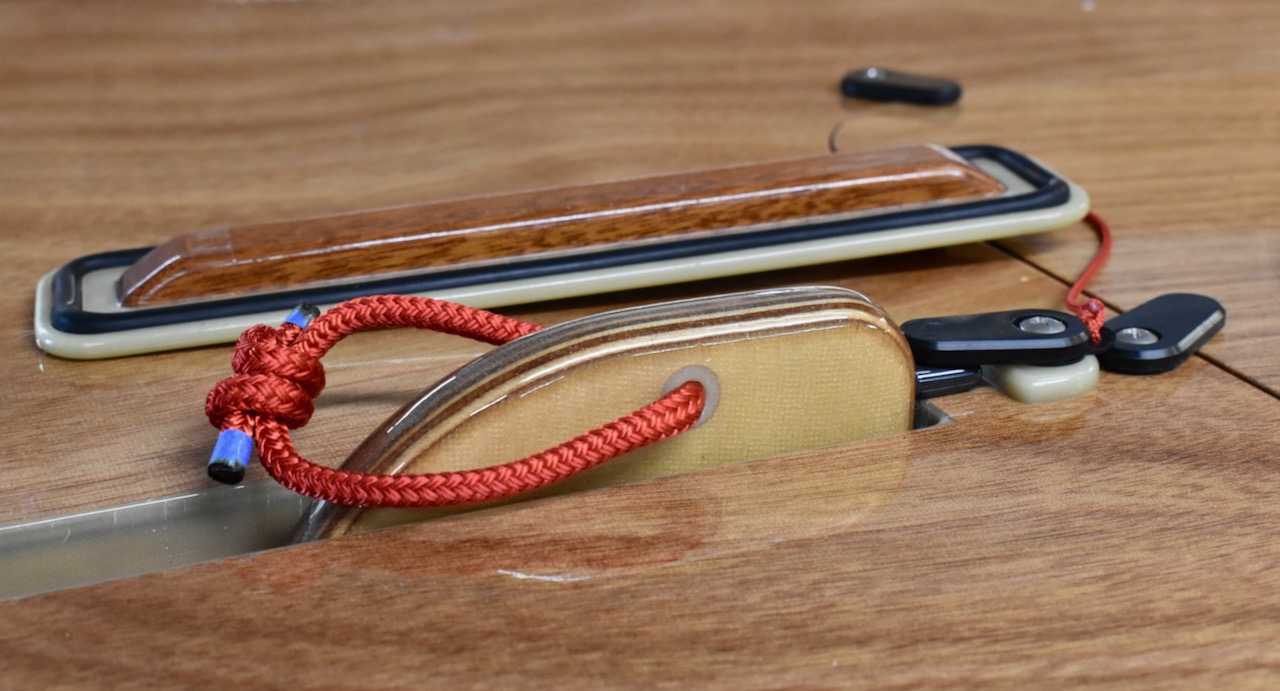
For post-2021 kits, use the forward daggerboard cap turndog to hold down the daggerboard by closing it over the hold down pin.Pre-2021 daggerboards are thicker and shaped differently at the top. A loop of line at the right length becomes a hold down when captured by the aft turndog.
The Tack clips onto the boom as shown. (This image shows an older style gooseneck.)
The outhaul (asymmetric) snap hook clips into the clew and the outhaul line should be snugged through the v-cleat on the boom:
PT 11 Outhaul configuration during a regatta. Schooner Sir Isaac in the background.
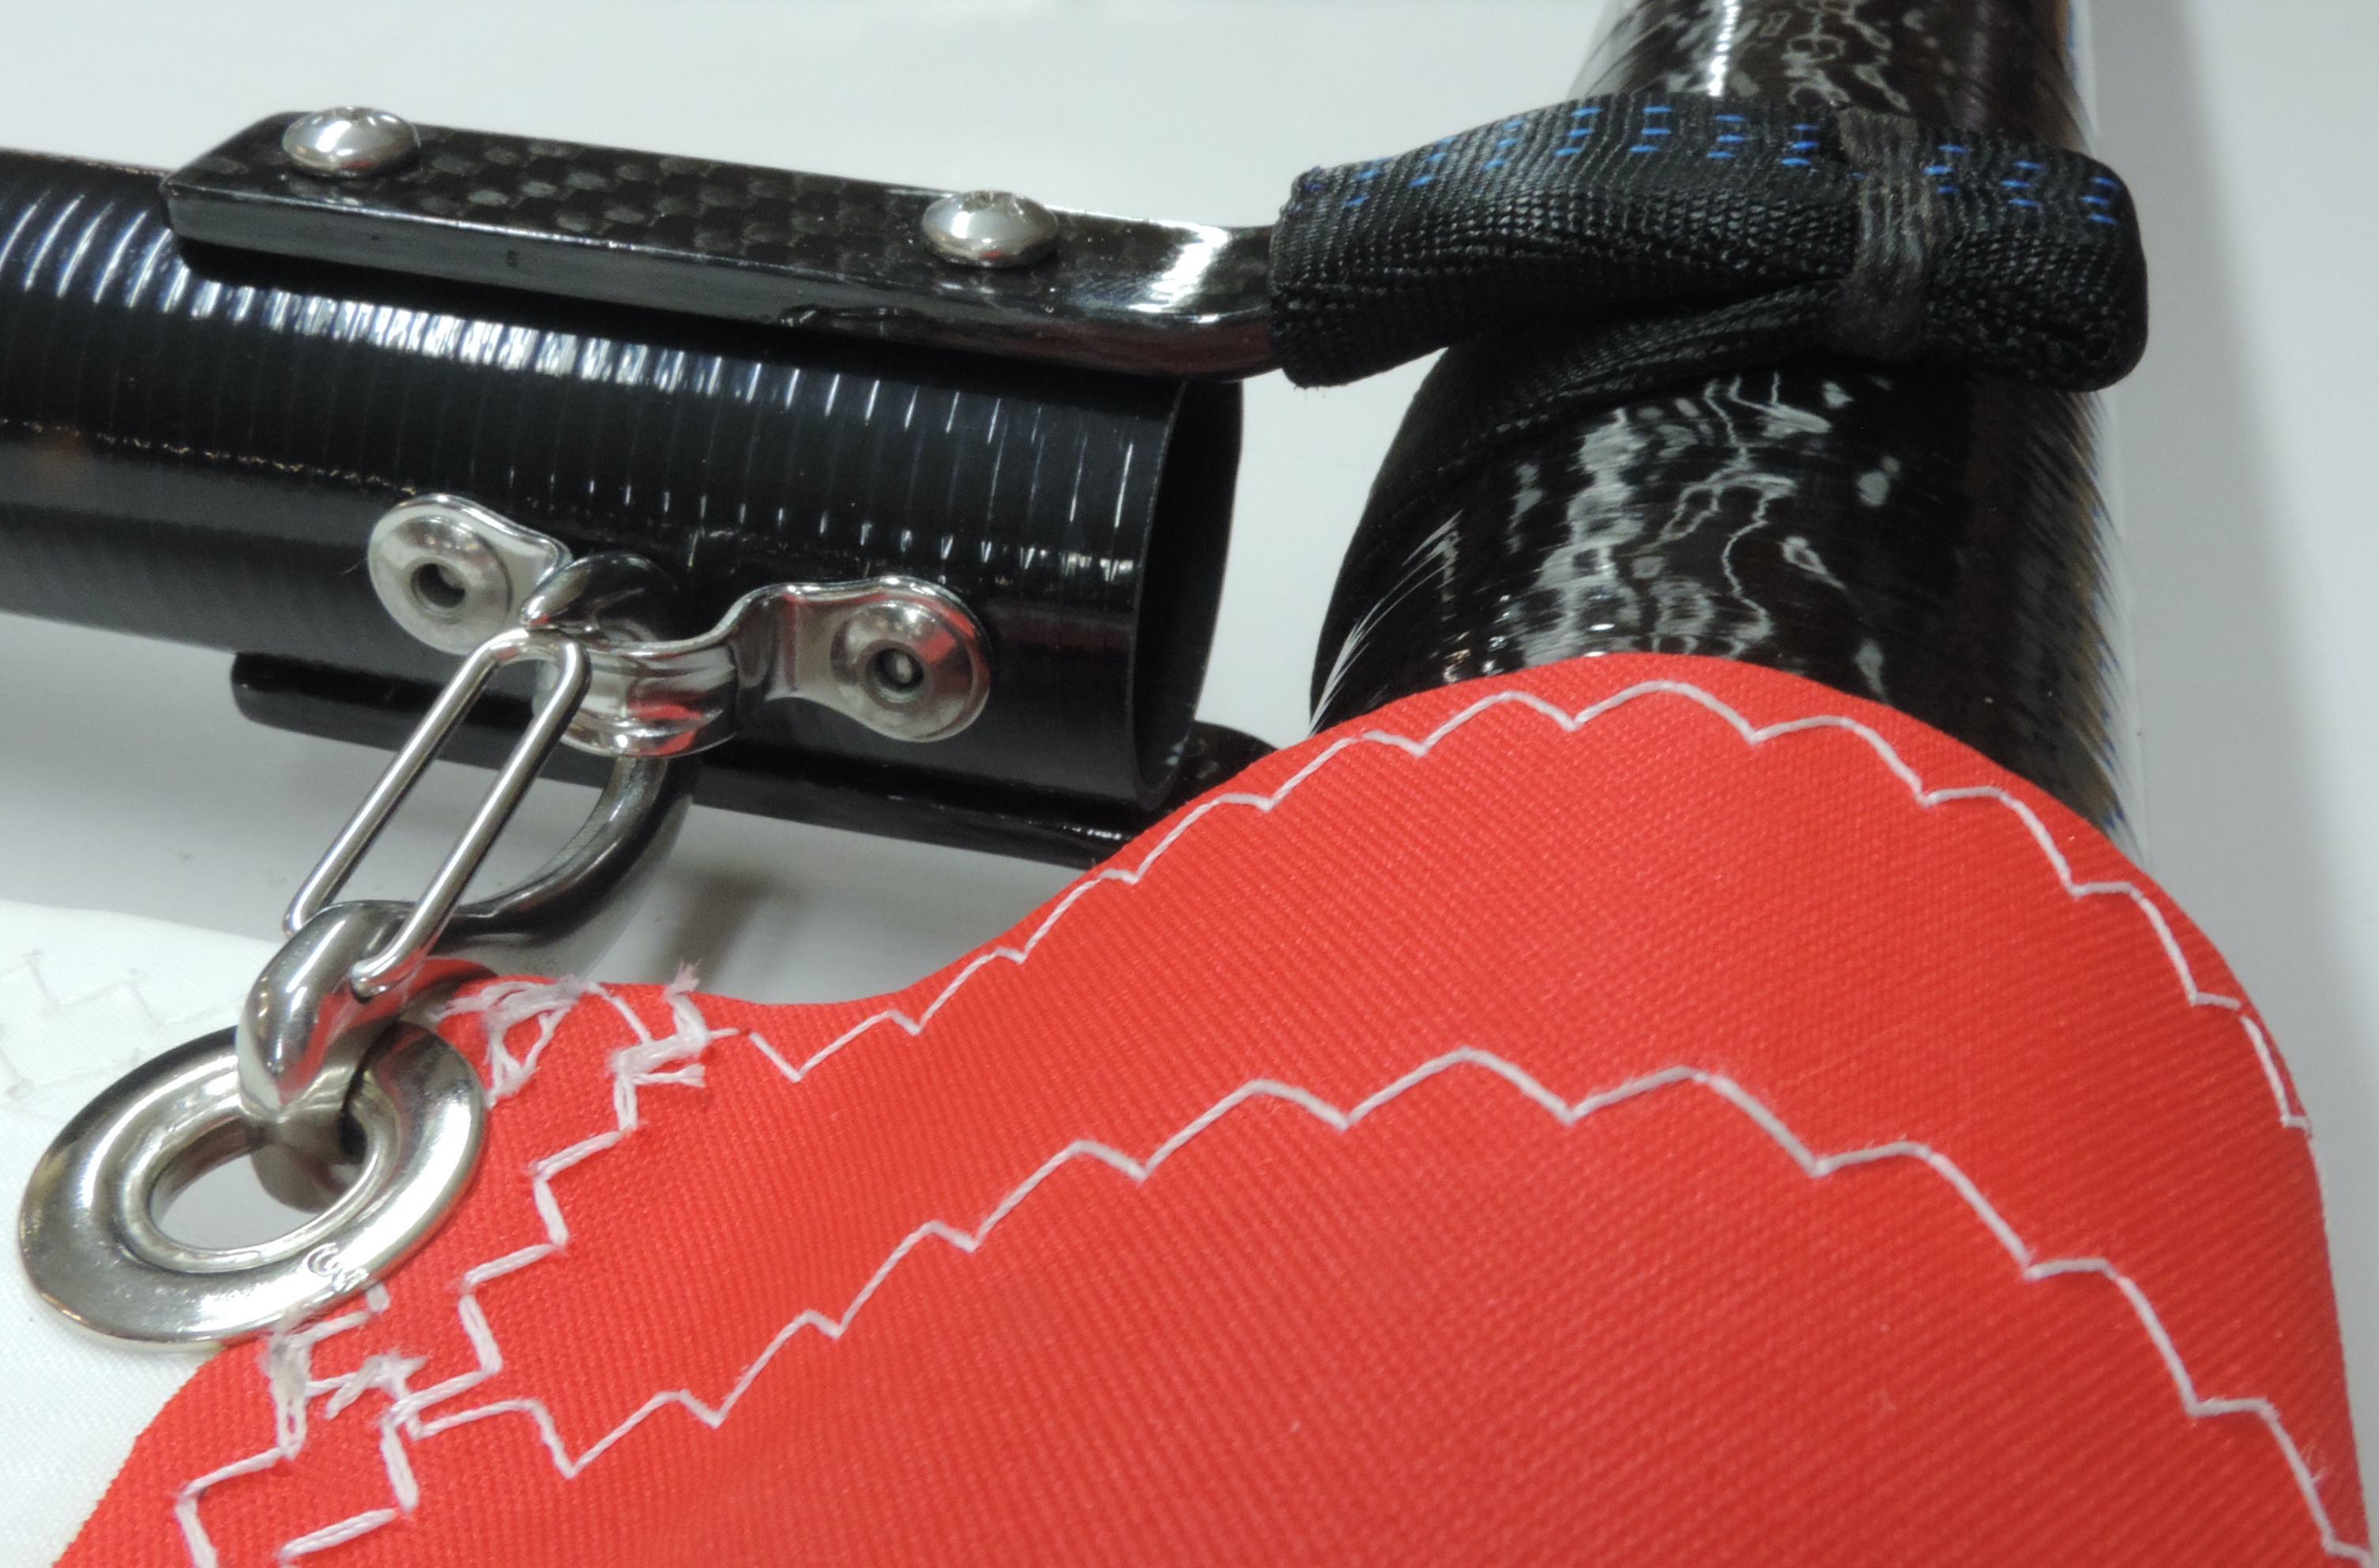
The vang clips into the eye strap on the mast.
The vang controls the twist of the sail. Controlling twist is important for getting the most power out of the sail, but don't overdo it! Some twist is good but the boom isn't un-breakable.
When adventuring or in fluky winds, we carry our oars with the oarlocks in the forward sockets and the handles tucked under the bow as shown above.
If you are new to dinghy sailing, avoid this use of a slip knot on the main sheet. Unsuccessfully yanking the slip knot free in a puff is a recipe for capsize.
If you capsize when sailing, after righting the boat, make sure the mast is fully seated in the socket before taking off again.
If you are new to dinghy sailing, it is better to start in protected waters or when there is an onshore breeze, preferably steady but not strong.
Keep your weight forward for speed, but move aft in stronger breezes and downwind sailing.
If the water is cold in your area like it is on Puget Sound, wear a wetsuit or drysuit in case you end up in the water. Hypothermia is no joke. It is always advisable to wear a life-jacket/PFD.
Learn to stall, or "park" by pointing into the wind and letting the sheet go. When the wind picks up more than you feel ready for, or you have taken water over the rail and you are feeling a little out of control, this is a good way to take stock: bail, check your rudder and daggerboard for kelp, sort out lines, and take a swig from your thermos before heading off again. The sail will flap and make noise but that is not a problem. When you are ready, reign in your sheet, and continue or head for safety.
* Update to this article: We have received positive feedback on a product calledTef-gel, used by riggers and boaters for the purposes of anti-galling and anti-corrosion in marine environments. We have not yet figured out how to get mini quantities into kits cost effectively but there are small-ish versions available in your local chandlery or online.
The PT 11 Nesting Dinghy Connective system is unique and it makes up a decent portion of the cost of the kit. After roughly 200 PT 11's sold to date, there have been very few issues with this connective system. In this article we are aiming to share some lessons learned about these parts based on customer feedback and experience. A brief description
Our key to easy and fast assembly (of the two hull-halves) is to separate the two main functions of aligning the two halves and joining them. The alignment hardware is molded from carbon fiber, but it is robust and affordable for us to produce.
The connective hardware, used to join the two hull halves as they are correctly registered by the alignment hardware, are CNC-machined from 316 stainless steel.
This hardware consists of threaded sockets bonded into the forward half of the hull, and sockets with threaded pins and knobs bonded into the aft half; these parts are pre-positioned in the structure. Clip rings ride on the pins to make them captive, and this system allows assembly of the boat in the water without leakage.
The manual instructs builders to keep the stainless parts clean throughout the process of gluing and painting the boat. It is after the boat is finished that we instruct builders to lightly grease their hardware. Here is where some additional explanation is needed.
A few customers have had a pin get stuck at some point in the completion of their boat. The why of this has been a challenging topic but when it happens, it is terrifying for us as well as for the builder and can be costly to remedy.
According to Wikipedia, "Galling is caused by a combination of friction and adhesion between the surfaces, followed by slipping and tearing of crystal structure beneath the surface.[2] This will generally leave some material stuck or even friction welded to the adjacent surface, whereas the galled material may appear gouged with balled-up or torn lumps of material stuck to its surface. Galling is most commonly found in metal surfaces that are in sliding contact with each other. It is especially common where there is inadequate lubrication between the surfaces." Why and What to DO:
So, the question is why do the pins sometimes seize and what do we do about it?
The why is a bit of a mystery to all of the experts. One recently seized after it had been greased, so it's not just the lack of grease. We could also change the material of just the pin but hundreds of these have worked fine in all stainless steel.
Tight clearances are probably the cause, but we think we need the snug fit in both the forward and aft sockets to keep the hardware aligned when it's being installed. We are opening up the tolerances a bit on the next run of hardware, but it looks like the best insurance is going to be using a never-seize style of grease, applied after your boat has been finished (to keep grease from screwing up your painting and finishing).
It seems that the seizing is mostly happening at the tail end of the building process, so apply Never-seize * when re-installing the hardware after finishing. Clean the sockets and pins and apply a tiny bit (with a skinny stick of similar) in the threaded sockets and in the aft sockets and rub a little bit on the shiny part of the pins.
If you feel anything like seizing when assembling your boat, STOP. Is there misalignment? If you back out the rest of the pins, will the problem pin loosen up? Do your epoxy shims under the alignment clips need to be block sanded down just a bit? Are the outside edges of your alignment clips contacting the bulkhead edges?
If a pin feels stuck, remove the knob using two wrenches; 14mm and/or 9/16" to remove the knob, nuts and washer.
Put two nuts together on either end of the pin and tighten them together very tightly with the wrenches. (photos below)
Stand the hull half on end so that a bit of penetrating oil * can be applied and run down into the socket. Now try tapping and banging on either end with a hammer and wrenching on the end with the double nuts. Remember that the pin can only be removed from the socket in the forward direction because of the captive pin clip.
Still stuck? Get in touch with us.
If the pin leaves any roughness or scoring on the inside of the socket, that can be removed with a custom tool. Here's how:
Take a short piece of 3/8" dowel, chuck one end up in your drill, wrap sandpaper around the other end, hit the trigger and sand the dowel down until it fits loose enough in the socket that you can wrap some fine (400 or finer grit) sandpaper around the dowel and have it just barely fit in the socket. The sandpaper can be spray glued and rolled tightly on the dowel before using it to sand away any and all burrs and roughness. Finishing with an even finer paper is probably a good idea.
Spray-glue a bit of sandpaper to a flat stick to remove burrs from the pin before cleaning, applying the never-seize, and re-assembling the hardware.
DIY tool for cleaning the socket after removing a galled pin.
Caring for your connective hardware;
-Keep it clean before and after installation.
-As soon as grease is no longer a threat to gluing or paining, grease or ant-seize your hardware.
-At the first sign of binding, stop and assess alignment and possible causes.
-Refer to the chapter in your manual titled: Re-ASSEMBLY of Connective Hardware (p.288) including installation of the alignment clips. Precision parts require precision alignment.
-After a season of use, consider removing your pins, clean and reapply grease or anti-seize, and re-install. Refer to manual pgs. 319-320, "PT11 User Guidelines"
We continue to work on this and may update this blog in the near future as we learn more. You can download a PDF of this post HERE: PT 11-Connective Hardware Blog 2023
Ashlyn & Russell Brown
Customer comments:
When building I felt a little stickiness as I assembled my fasteners. I backed them out and applied a bit of lube. Even mold release wax should do the trick. I would guess that's what I used. A wipe with a paper towel. Tefgel is great stuff. As is moly anti seize. Any of these can be applied and cleaned off by wiping. Enough will remain. When wiping make sure the bottom of the threads has lubricant. I use paper towels and put my fingernail in the thread to wipe well. You do not need to see the lubricant for it to work. Galling is subtle but can be felt as it happens. It is a grinding crunchy feel as you turn the screw. If you feel that stop! Relieve any load on the fastener you can and back it out. As well, a tap or die can be used to clean up galled threads. With lubricant of course for cutting. Wd40 is not great here as it eventually evaporates.
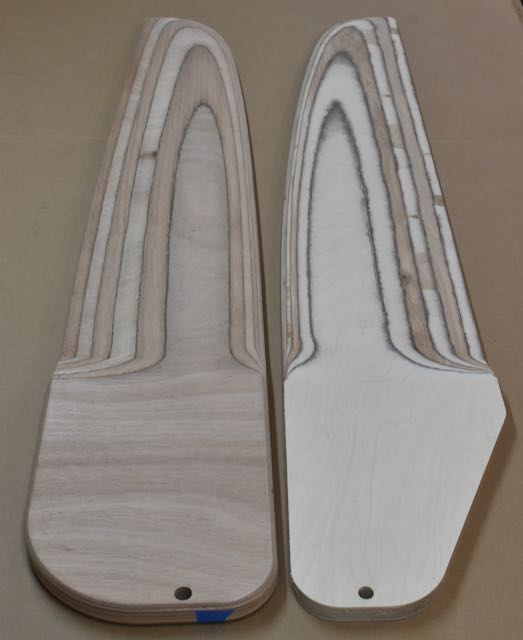
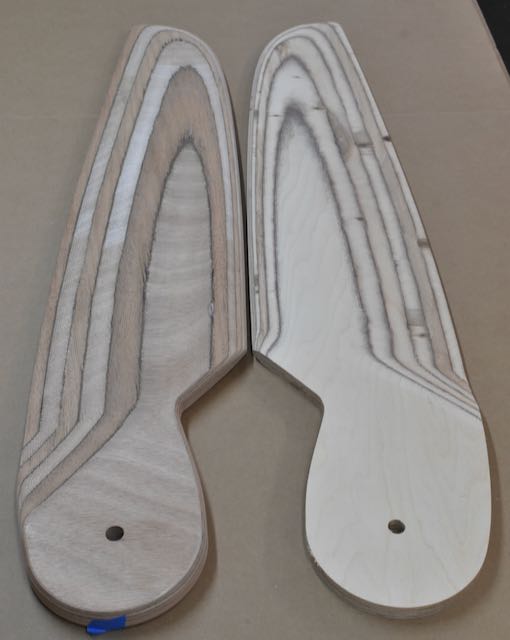
As previously mentioned, 2020-21 was largely spent reviewing our production process. Another redesign included the PT 11 foils kit. We took our ideas to Paul Bieker of Bieker Boats for his expertise with foil design. The new foils are thinner, using 18mm Birch plywood instead of 24mm Okoume. The Birch plywood is more dense, chosen for its strength at this thickness and not for it's looks. The machined birch plywood is not as handsome for clear coating as the Okoume but we are quite pleased with the overall change.
Modifying the foils kits affected many other parts of the kit, so those changes are are reflected in a total rewrite of the foils manual and changes in the boat itself (the daggerboard trunk is narrower, etc).
Machining the daggerboard and rudder from high-grade plywood is a good way to produce very efficient and relatively light foils. The process is far from easy though. It has taken much trial and error and a very good CNC programmer (Turn Point Design) to come up with the final product. The price of this foils kit reflects quite a lot of machine time for each set.
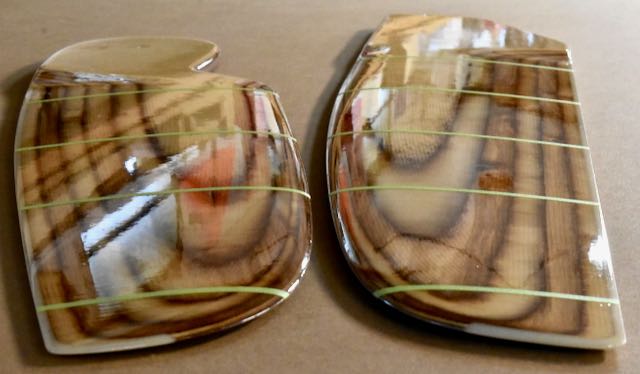
Left, the Okoume daggerboard blank. Right, the Birch Daggerboard blankRudder blanks using Okoume on the left and Birch on the right.Fore-shortened image showing the NACA foil shape with lines of tape.PT 11 foils 2022. Painted foils look good!The new daggerboard hold down uses the existing trunk cap turn-dog and a composite "pin" that is bonded into the dagerboard.The complete 2022 PT 11 foils kit as sold by Chesapeake Light Craft.
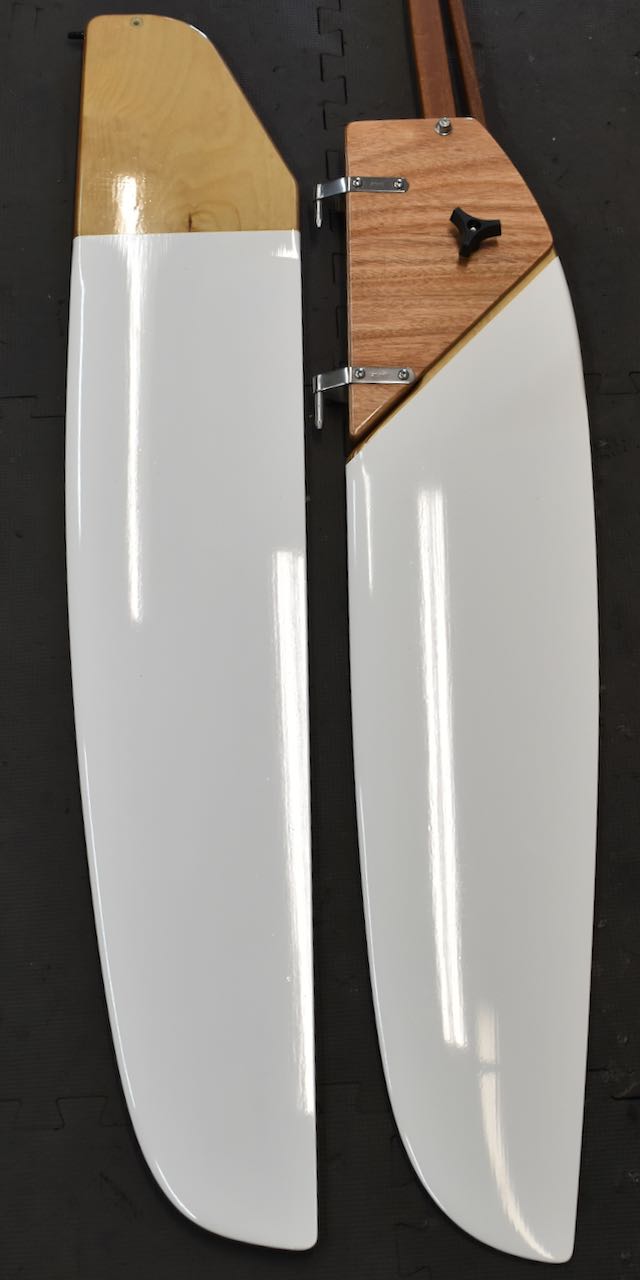
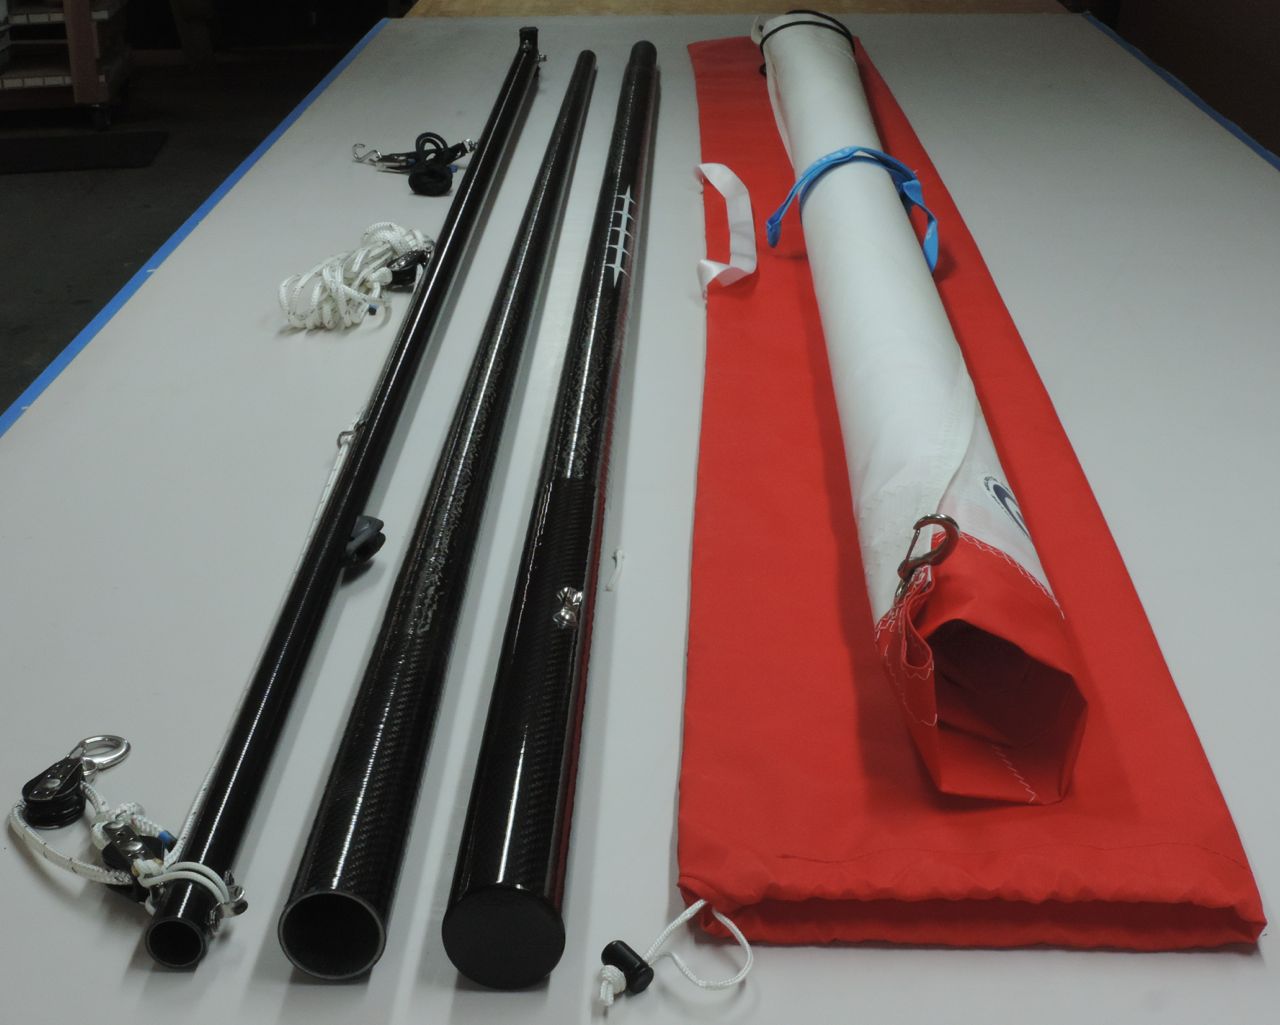
The PT 11 sailing rig is one of our creations that we are quite proud of. The carbon tubes are engineered specifically for this rig and manufactured in Washington at Innovative Composites Engineering. It is fun for us to imagine our tubes along side Space-X & NASA tubes, and among top name windsurfer and paddle boarding tubes. Mostly we are proud that this quick-to-set-up rig, with sail and all hardware & rigging, weighs a scant 10.5 LBS.
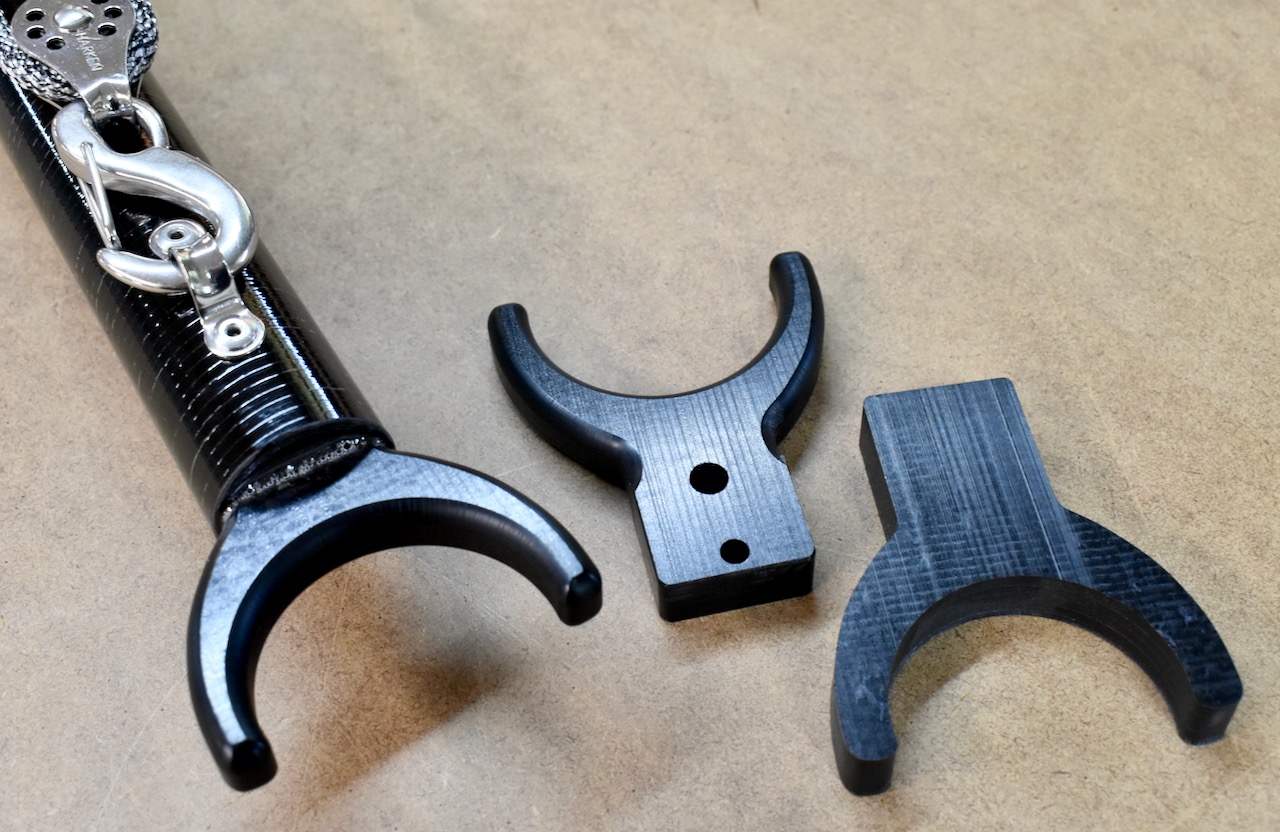
Our boom attaches to the mast with a custom gooseneck. For years we have made these goosenecks out of vacuum bagged carbon & epoxy in a multi step process that included a lot of carbon dust, finishing, tapping, assembling, and hand stitching tubular webbing onto the forks for a soft contact point on the mast. After hundreds of these, there just had to be a better way.
In 2021, as we sought to offset increasing costs in general and reduce labor where we could, one of the things we did was redesign our gooseneck. After years of trying to think of a better way, Russell began sketching out a new design based on using 1/2" Delrin plate and CNC router technology.
The resulting gooseneck is clean, practical, stronger, and most importantly, much less labor to finish and install. The new goosenecks are installed by pouring epoxy around them. A tight fitting foam plug traps the epoxy. Speaking of tight fitting foam plugs; there are 7 plugs in the 3 tubes that these rigs are made from, 5 of them custom made of different sizes from dense rigid foam. Why? To keep them from filling with water and sinking of course. Why do we need 7 plugs to plug both ends of 3 tubes? The seventh plug is a secret. 😉
The new gooseneck, right to left: CNC machined blank, post-CNC blank drilled & edges rounded, gooseneck installed in the boom.
PT 11 sailing rigs are still produced by Russell and drop-shipped from Port Townsend. They can be purchased through Chesapeake Light Craft. Customers who purchased their PT 11 kits from PT Watercraft pre-2021 should contact us directly regarding PT 11 options. We have experienced periodic delays so lead times vary.
This first quarter of 2022 has been interesting for Russell and I here at Port Townsend Watercraft.
Chesapeake Light Craft continues successful production of the PT 11 Nesting Dinghy Kit. You can see the details on their page here.
What has changed?
PT 11 Nesting Dinghy kit packed for shipping from Chesapeake Light Craft 2022
There is a price difference from our previous rates. This was to be expected. For one thing, CLC includes the WEST SYSTEM Epoxy Kit that had been an option on our package. We are happy about this because we have always recommended WEST SYSTEM for this project. Anther big one is that our cost of the connective hardware doubled. They are, however, exquisite thanks to a local machine shop here in PT. The total kit price hike reflects both the inclusion of the epoxy kit and material price increases across the board from plywood to stainless steel. That considered, customer investment has not increased by much because we made efforts to streamline production of certain parts to offset those inevitable material price increases. Russell and I would have been hard pressed to continue production on our own with all this factored in..
CLC also has a well established packing system for their kits. This makes the kit package more manageable than our long and heavy plywood crate.
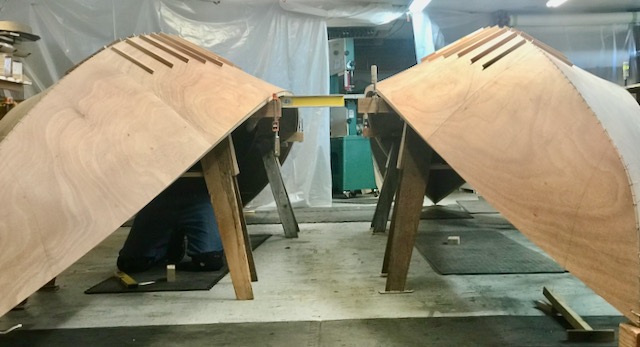
In our shop in Port Townsend we have finally been touched by the "supply chain delays" talked about in the daily news streams. A lack of sail cloth, delayed our sail production. We finally learned this after several ETA predictions that came and went without sails. We are assured this time that sails are on their way so we can ship out the rigs on order. (Talk about stress!)Russell has been doing a deep dive into the boat building technique referred to as 'Tortured plywood'. One of the 3 foot models (of which there are at least 8 versions), have been translated into 27ft long hulls. This project has been both exciting and frustrating beyond expectation. More to come on that later.
Early and very deceptive stage of tortured plywood hulls. This technique is somewhat miraculous.Jzerro 'flying' in Puget Sound
Those who know about Russell's earlier boats, including his windward proas, may have seen our videos of "Jzerro". We sold Jzerro a few years ago and of late, have anxiously followed the new owner Ryan Finn, on his massive journey from New York to San Francisco via Cape Horn. This last week, Ryan rounded Cape Horn successfully and has been flying northward at speeds from 9 to 19MPH on the edges of and through gales and rough seas. You can follow his tracker progress here.
Also see 2 Oceans 1 Rock on FB for descriptions of his journey.
More updates to come soon, including the 2022 Shipwright's Regatta this Saturday (Postponed a month due to a gale in the bay in FEB 26th. (there may be more than one PT 11 this year!) and an update on our new goose-neck design. AEB 😉
It has begun, Friends! Chesapeake Light Craft has their first orders for the PT Eleven Nesting Dinghy and we look forward to this relationship being successful.
The CLC team has been working diligently through the many details related to our collaboration. We thank them for including the PT 11 in their catalog.
Port Townsend Watercraft will be updating our website to function better on multiple devices and to reflect the changes in our business. We will maintain information about our designs as supplemental to the CLC website, and we will be creating new content related to our designs and our books.
We remain open to feedback, photos, and those particular questions that only we might be able to answer for now. Please send your favorite PT 11 photos to Ashlyn's GMAIL : PTWATERCRAFT@
THANK YOU to everyone who asked us to keep production of the PT 11 active and to all who have built our boats.
We are particularly fond of PT 11-in-action pictures and beautifully scenic pictures where even a small portion of the PT 11 is visible. Did you personalize your boat with some special detail? What color did you paint it? Of course, we love animals and pets-in-the-PT 11 pictures are welcome too.
PT 11 kits will become available this year if all goes as planned. The hiccups include supply chain issues and rising shipping and material costs. We are making forward progress.
We have been working with a well established kit company who long mentored our fledgling business and really wants to produce our kits. We will continue to manufacture and supply them with specific parts that make our kits unique.
This has been an incredibly interesting and challenging task to put our process into a transferable format. We are ‘creatives’, not ‘business managers’ persay. That we have managed, is nothing short of amazing to me as I fill in lengthy spreadsheets with suppliers, part numbers, current pricing, how many of what per kit, etc. Everything needed updated numbers. This rather daunting assignment has simply taken time to accomplish as Russell continues to make large runs of certain parts that get stocked in advance, to determine how those parts should be priced.
We have redesigned our rudder and daggerboard with help from very skilled friends. The new foils are thinner (18mm), denser, and slicker. The birch plywood is not as handsome for clear coating as the Okoume but we are pretty pleased with the overall change. Modifying the foils kits affected several other parts of the kit, so those changes are being made as well as a total rewrite of the foils manual.
We are working on a boomless rig for the PT 11. Why? Besides greater simplicity of set up and even lighter weight, a large portion of the cost and labor in our current sailing rig is in the boom. We have asked our favorite sail designers to work on this but getting a prototype is one of the supply chain hiccups. We know there will be trade-offs. It is the only way we see being able to keep producing sailing rigs that we would want to use ourselves.
With the retirement of our connective hardware machinist at the end of 2019, early inquiries at machine shops nationwide were not encouraging and we will not take this overseas. We discovered, however, that Port Townsend has a first class, family owned and operated machine shop. Truth be told, the initial quote took time to digest but we considered quantity, precision, and other local advantages. We just picked up the first run and the parts are excellent.
Kit pricing is to be determined but we expect minimal change. Our efforts to simplify parts of production are also intended to offset increased costs in other areas aiming to stabilize cost to the builder.
We expect to announce kit availability later this Summer. The details of ordering will be explained in the next update.
I continue to add names to a list of seriously interested builders. Everyone on that list will receive an email update before this blog. I do this because some of you have been waiting a year for news of kit production continuing. It is all of you on that list especially, whom I wish to thank for your patience and encouragement. It is deeply appreciated. We are excited about finding a pathway forward.
First in production will be the PT 11 Nesting Dinghy and second, the PT Spear. We are not 'there' just yet and we totally understand if you find or have found a different project to work on.
Thank you again,
Ashlyn Brown
P.S.
The PT Skiff is not in our hands at this time. There is no manual that addresses design changes. The designers may have some information for experienced builders but we will not be offering tech support for that project for the time being.
PT 11 owners and builders may find these updates valuable. We have made PDF's for easy download and in color!
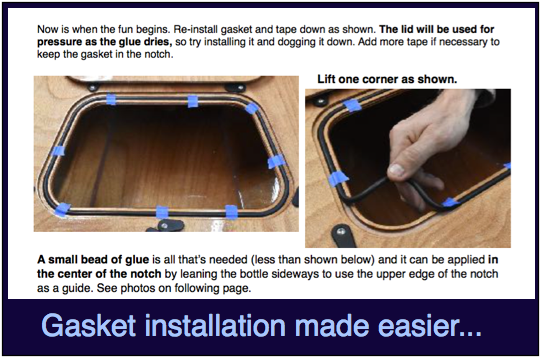
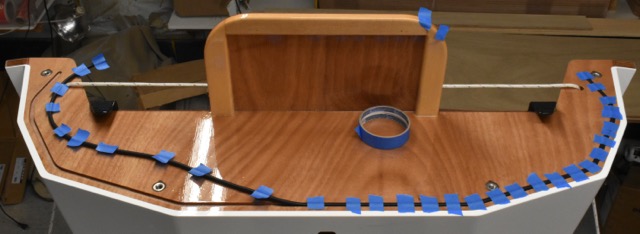
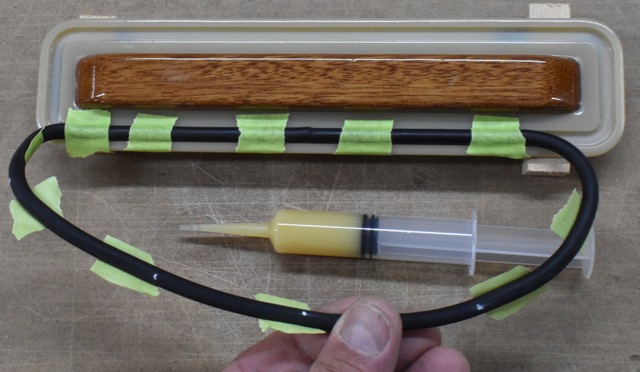
While we are much happier with the new gasket installation method, the hull gasket is still vulnerable to being yanked out of its notch at the lower corners. Why is this? Because surgical tubing is difficult to adhere to and its also very “grabby”, meaning, hard friction when assembling the boat or otherwise, can pull the gasket out of its notch. Flushing with fresh water and re gluing is quite easy but we’d really like to test using neoprene for the hull gasket. Neoprene doesn’t have perfect memory but we think it would work fine for the hull gasket; it’s not grabby and it glues well.
For anyone who wants to try the neoprene hull gasket, we will send you 5ft of the stuff in exchange for a full report of its performance. New method for installing or replacing gaskets. PDF
The surgical tubing is still our preference for the hatch and dagger board trunk gaskets.
The above PDF includes the previous two 'PDF's along with other details from the end portion of the new manual starting at the foot braces section.
Another update we recently posted concerns a tight fit on some dagger boards due to over thick trunk log plywood. If your dagger board is too tight, see the fix HERE.
We have had a few complaints about dagger boards not fitting in their trunks, but we knew that we had designed in plenty of tolerance, right? We figured that it was sloppy epoxy work or wear strips that weren’t glued down tight. Imagine our surprise when the board didn’t fit into the trunk in our new boat!
What is causing this? Well, to start with, the board is binding at the fore & aft edges, where we thought we had enough clearance. Are the new boards longer in the fore & aft dimension? It doesn’t appear so.
The solution to this problem for existing builders will vary depending on whether the trunk and foils have been built already, or one but not the other have been built.
We apologize for difficulties caused by our screw-up. We will ship out replacement trunk logs for anyone that hasn’t built the trunk yet and we will trim a bit from the aft edge (and re-round) any dagger boards shipped for existing boats.
Please keep in touch if you have any similar issues. We could have found and corrected this much sooner had we known that it was a fore & aft clearance issue. We care about this stuff a lot, so if you find a real issue, let us know.
The new PT 11 manuals are ready. Who needs one?
A very short update about gluing the bumper: We now advise not to use Tolulene to prep your bumper for gluing. It appears to be totally unnecessary. Just sand thoroughly and wipe clean before gluing as described in the manual.