Every time Russell has a boat to build, he seeks better ways of doing things. In this case, a simplified method for gluing the puzzle joints revealed itself. The manual for the PT 11 ‘Spear’ has this section but earlier versions of the PT 11 nesting dinghy manuals have an earlier method. I have created a pdf file of the 7 page replacement for pages 7 through 14 in “Building the PT Eleven” for those who have an older version and have not yet begun to build their boat. This may also be interesting to anyone building a stitch and glue kit with puzzle joints. Click HERE to download the .pdf file. (533kb)
Category: PT SPEAR
Clear
A Review by Sandy Goodall;Sailing the PT 11
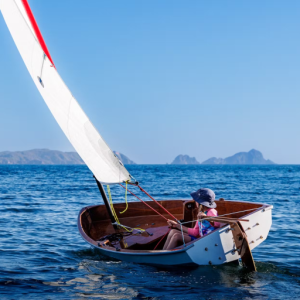
The PT 11 is a beautiful piece of design work. The finished boat is lovely to look at, and a pleasure to be in, whether rowing or sailing. Even at rest, its simple yet elegant form seems to suggest smooth, efficient speed.
The daggerboard and kick-up rudder are pure eye-candy. Beautifully shaped and finished, they far exceed the foils usually seen with kit boats. They are not only well made and good looking, but their plan and cross section shapes are extremely efficient….which helps the boat sail to windward like a true thoroughbred.
Rigging the PT 11 could hardly be simpler. The two-part free standing carbon mast slides into a sleeve on the luff of the sail (like the famous Laser dinghy). Then just stand the rig up in its mast step tube. The boom has a neat “fork” that rests against the aft face of the mast, rather than the usual goose-neck fitting. Just moderate vang tension is enough to hold the boom against the mast, tension the luff, and control the leech twist.
Because the mast is a flexible, free-standing wand, it bends progressively under increasing pressure, gradually flattening the sail, while allowing the leech to open and de-power in a gust. The result is that once sheeted in on a beat, the sail needs little trimming. In fact if you lodge the tiller extension against the leeward corner of the gunwale / transom, the boat is happy to self steer to windward! This boat sails unusually well to weather, pointing high and making very little leeway.
The PT 11 is a very slippery shape, and it responds well to the lightest breezes, even with a “full grown” helmsman (230 lbs). The boat is surprisingly quick to plane, and the transition from displacement to planing mode is almost imperceptible.
Many rowing dinghies are a real compromise when it comes to sailing, but this one performs admirably, even as a dedicated sailing dinghy. I can imagine having a grand time, racing against my friends in a small fleet of PT 11’s. A real pleasure to sail! Sandy Goodall Sail Design Consulting
PT 11 Tiller and Hiking stick
Our tiller and hiking stick stock is made of Sapele. The tiller is tapered on 3 sides, shaped at both ends and drilled. The hiking stick has rounded ends, chamfered edges and drilled for attachment. 
The builder finishes the tiller (on the right) by rounding the edges, hand sanding and oiling.
 The length of the hiking stick is just right to fit in the corner of the transom of the PT Eleven, for hands free steering when needed. It also folds and stows well.
 Tapering the tiller requires a router jig and so we offer this kit with most of the job done for you. We also offer untapered, 1″ tiller stock, for the builder’s who wish to shape their own. See the OPTIONS PAGE or the ORDER FORM on our website for prices.
PT Eleven Foil Kits
FOILS (DAGGER BOARD AND RUDDER) KIT
Foils are like wings that operate underwater. As with sails, the shape of the foils directly affects performance. The PT 11 sails amazingly well against the wind, mostly due to good foils.
Dinghy foils are usually either very expensive or they are crude and inefficient. The PT 11 foils are neither, but like the boat itself there are multiple glass & epoxy steps to make them long lasting. One could just epoxy coat them and go sailing, but from our perspective that would be a waste of very high quality plywood and a lot of CNC machine time.
The kick-up rudder design is something we are proud of. The case is fun to build, works very well, and folds for stowing.
Building the case requires multiple epoxy steps and can be done while finishing the foils.
Our foils kit contents are shown in this picture, along with the optional tiller and hiking stick. The foils are a machined NACA .012 section.
A detail of the steering hardware package; Note the scribe marks on the rudder case walls for aligning the pintels.
The rudder and dagger-board are machined in halves from high grade Okoume plywood.

The halves are then glued together and vacuum bagged in our shop before shipping to the builder. This picture shows the finished foils.
The Rudder folds for easy storage.  See the OPTIONS PAGE on our website for prices.
A Bumper for the PT Eleven
A good bumper for the PT 11 has been a priority since the beginning.
We have seen lots of different dinghy bumpers over the years, lots of them falling off or the rails falling off because of all the fasteners used to hold the bumper on.
We know that bumpers on dinghies are a challenge and we have tried different types; the favorite being 3/4” braided nylon rope glued into a notch on the outside of the gunwale. This bumper but was very hard and probably quite heavy when wet, but it lasted over 20 years, and never came un-glued.
The gunwale on the PT11 (as well as the rest of the boat) has to be sealed against moisture intrusion for longevity, so installing a bumper with fasteners is out of the question, unless you are willing to replace the gunwale periodically.
The most highly recommended dinghy bumper is a round closed cell foam covered with a fire hose like canvass material. This is usually attached with hundreds (I’m not kidding) of screws or ring nails, but could be glued on. See following photo.
 The challenges with this bumper are:
1.How to finish at the ends. It can’t just be cut as the foam would be exposed and the canvass will fray. Usually the foam is cut short and the canvass folded over and sewn, but in a nesting dinghy this would have to be done at all 4 bumper ends at the joint between the hull halves as well as at the transom and would likely need fasteners at these points.
2. it adds to the overall width of the boat.
3. it would be difficult to install straight and clean and may not look so hot.
4. it would be very heavy when wet. … Oh, and it’s very expensive..(nearly $10/ft)
All the above is to explain how we arrived at the glue-on extruded rubber bumper.
We originally were planning a C-shaped section that would glue over the outer edge of the gunwale, but it would have to be glued on with something other than a contact adhesive and there would be challenges at the stem, transom, and in fitting around the oarlock riser blocks.
Thus we came to keeping the outer edges of the gunwale square and gluing a custom extruded bumper to the 1” wide flat present on the outer edge.
The bumper shown in the following photos was designed by us for the PT 11 and made by a manufacturer who makes rubber bumpers (chafe guards) for inflatables.
These bumpers are made from non-marking compounds and can be glued on with Hypalon glue, the same glue used to attach this type of rubber to inflatables.
Gluing this bumper on to a PT 11 is a bit of a process. The hypalon glue is two-part, stinky, and must be applied in a dry area. Being a contact adhesive, no clamping pressure is needed, but you only get one chance to put the bumper on straight.
Repairing sections of this bumper would be quite easy and could be done with a one-part contact adhesive.
The die used to make our bumper will be modified slightly and another prototype made before we order the huge quantity necessary for a minimum order.
An instruction booklet will be included with the bumper kits.
PHOTOS


Visit ptwatercraft.com or,
Contact us for more info..
Setting up and packing up the PT eleven sailing rig
I have just posted a youtube video of setting up and packing up the sailing rig for the PT Eleven nesting dinghy. This is something I was supposed to do before the Christmas holidays, and, well, I forgot. The foils you see are the foils that we provide as a kit and details are on ptwatercraft.com. The sail was our first design, though this video was taken before we trimmed up the foot just a little. We have a new design that has 2 short battens instead of the full one at the top. It is sleeved on and is really easy to manage. The shorter batten allows for a looser sleeve. Since we have had requests for a sail with a zipper luff for use with a halyard, we can now use the same design with a couple of hours additional labor to offer as an alternative. Having a halyard also means altering on the mast and adds complication over the sleeved luff. The total weight of this rig is only 13 LBS.
Prices for sails are still unknown. To have them made locally, they would cost $750-800. We are currently awaiting a quote from an offshore sail maker. ..Bummer to have to go offshore but the buyer can choose local artisan sails or production sails based on what they would rather pay. Luckily for some, principle can still outweigh cost, and we can offer that choice if someone wishes.
The mast and boom are also not yet priced. I hope we will have a price idea very soon. Being a little company as we are, it is a bit of a trick to get the carbon spars wholesale in small quantity.
To view the new video, click here, http://www.youtube.com/watch?v=KP3N_qTqPEo&list=UUVkWkVo0rpJ1I3xgJjmYUFQ&index=1&feature=plcp or visit our ptwatercraft channel. Cheers and Happy New Year! 🙂 (changed the link for the video so I did not have to use Youtube music!)

Self steering on the PT Eleven
On a recent cold day, we drove the PT Eleven over to Mystery Bay and sailed it up into the next bay about a mile to our boat, Jzerro. The seagulls had made a real mess on deck and we had some general maintenance to do. On our sail back to the launch ramp, we remembered to snap a couple of pictures of the “Self steering” on the PT Eleven nesting dinghy… The hiking stick is cut to the right length, and tucks into the transom corner. It gave us a chance to warm our hands in our pockets until we tacked. 🙂
Also..have you seen the latest sailing video? http://www.youtube.com/watch?v=H0dMkZcmKu8&feature=player_embedded

PT Eleven Daggerboard Trunk Cap
For those choosing to make their PT Eleven with the sailing option, we created a watertight cap for the dagger board trunk.
We chose G10 – Garolite in order to have a strong and stiff cap that would be as thin as possible (1/8th inch) so we could keep the profile very low and still be water tight. The dagger board trunk opening is close to the seat and the rower would actually sit over it with 2 people in the boat. Also, having a good lid is important if you would want to tow the boat.
The optional kit consists of a machined G10 Garolite cap with gasket groove & stiffener groove, gasket, mahogany stiffener, machined Garolite spacers, plastic washer, plastic tether washer, tether string, turn-dogs, and fasteners.
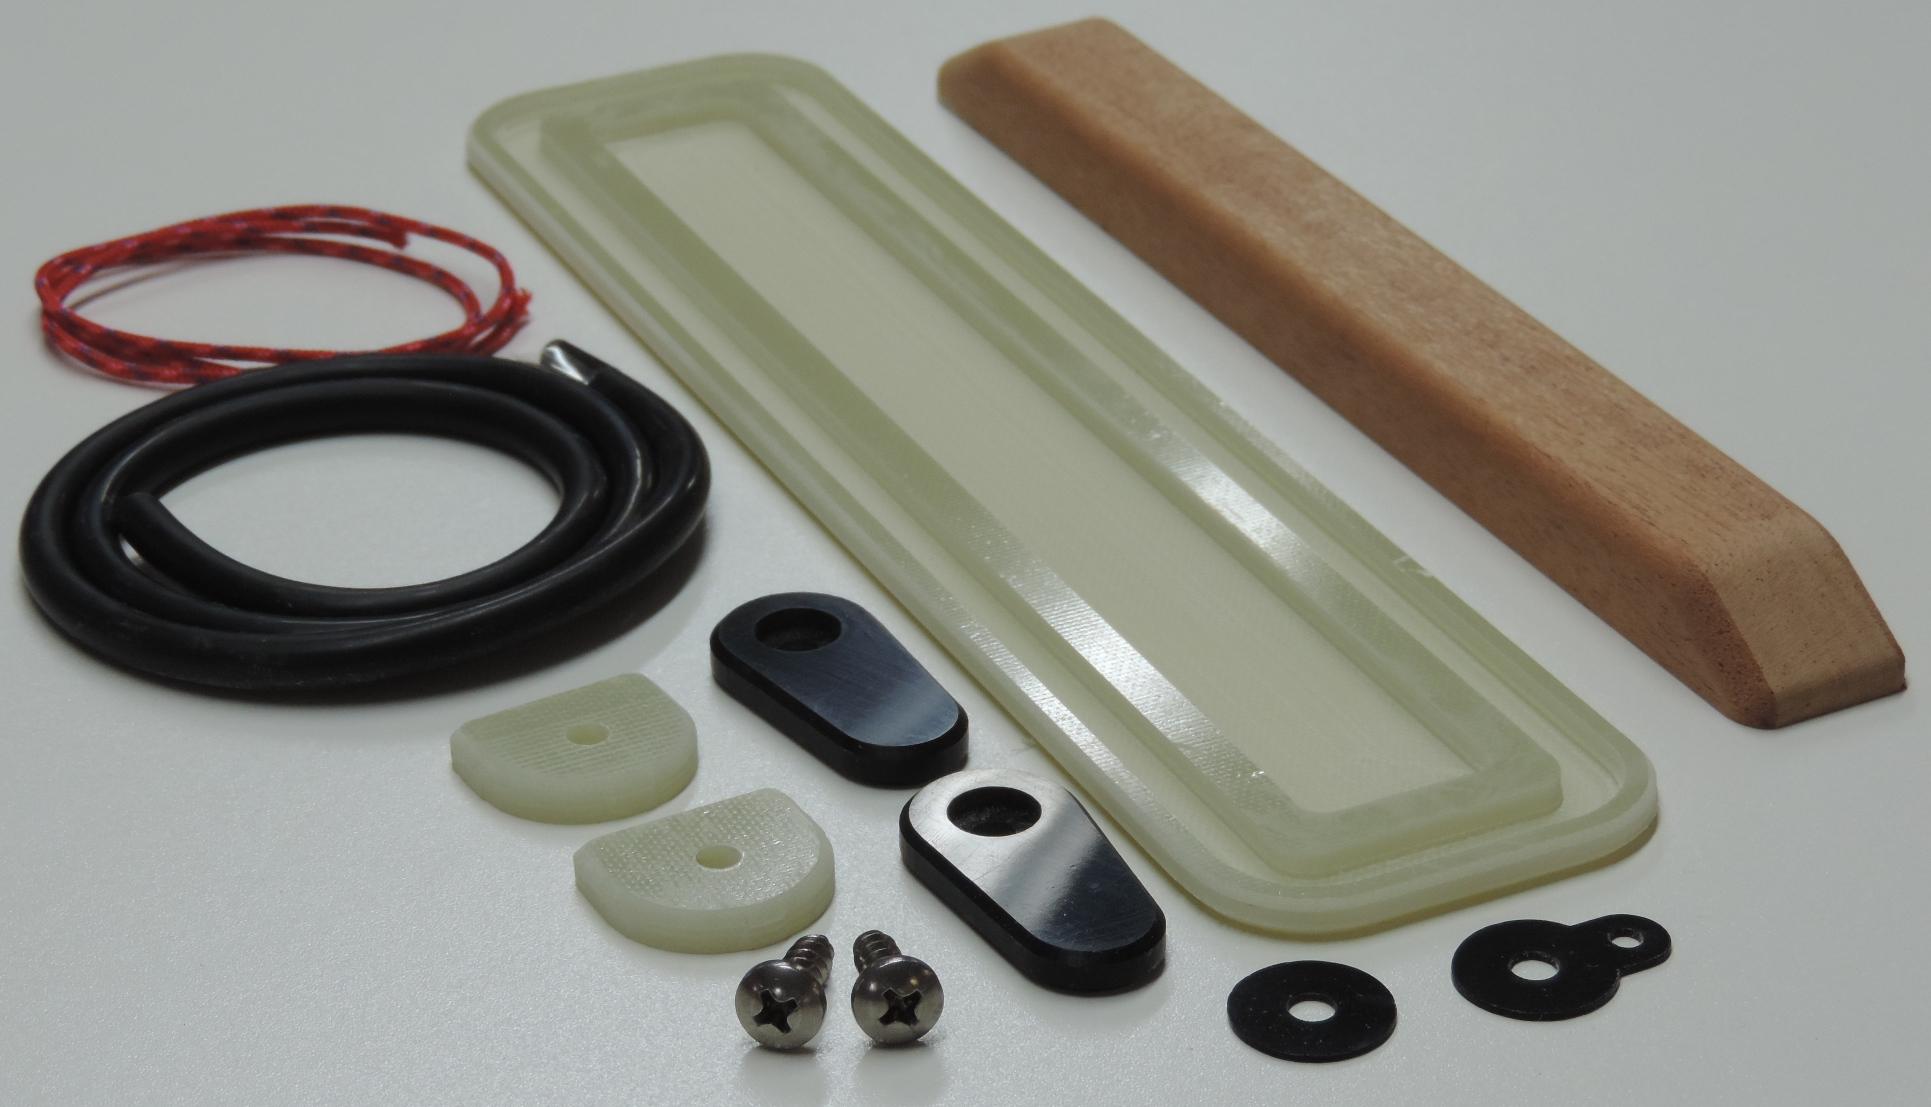
Below you can see the cap installed.
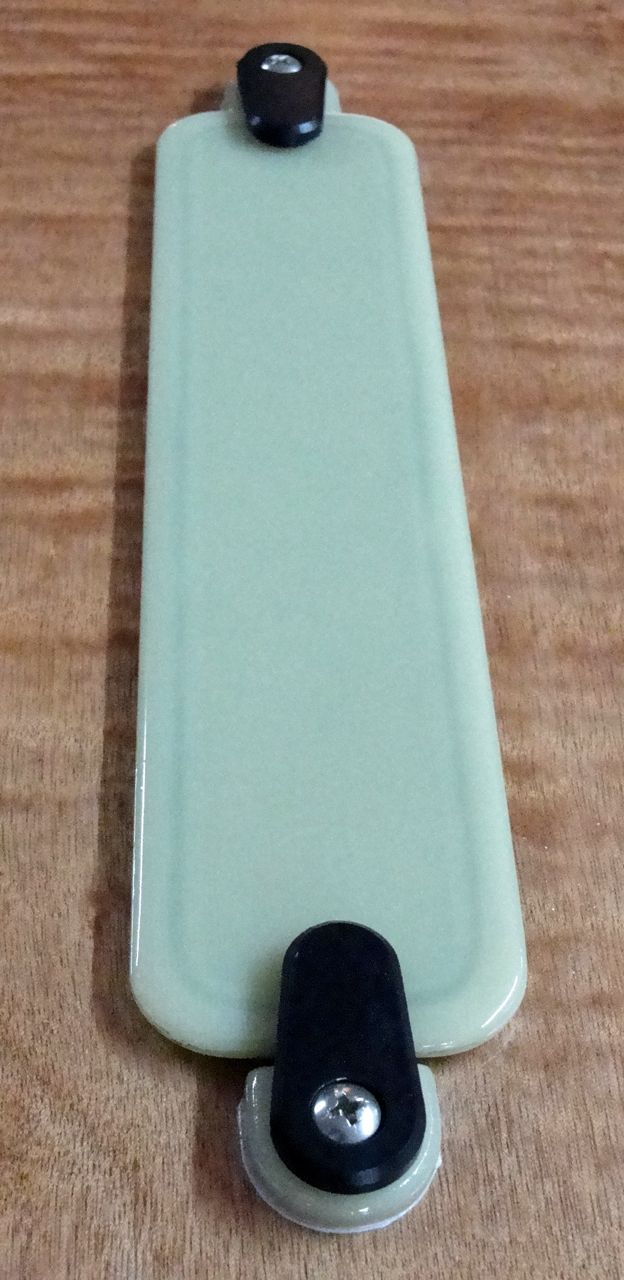
When sailing with the dagger board down, the turn-dogs also serve to keep the board down by resistance on the aft end and looping the string over the forward one. 🙂
PT Eleven; oarlocks and leather pads
There are several options that we have been working on to be able to offer for this boat. I will begin posting them. Pricing will be announced on our website soon.
We are using Australian made Gaco gated oarlocks because they work beautifully and they are lightweight and also because of the reduced pin size.
The socket only requires a 5/8” hole. We plan to offer both the oarlocks, sockets and riser blocks kit as shown as an option. 


LEATHER PADS
When nested, the forward half touches the after half in four places, three of which are edges against edges. Leather pads glued on with contact cement nicely protect these edges. The leather pads that we sell have a center-line mark to help position the pads. 

PT ELEVEN foils
Foil kit for the PT Eleven (shown finished) These are prototypes of the foils we will be offering in kit form. The foil shape (naca 0012) is NC machined from Okoume plywood in 2 halves. We bond the 2 halves together in a vacuum bag and the builder does the finish work. 

