This is my first experiment with time lapse photography and I am not altogether pleased. The gloss coat came out great but, time lapse isn’t like video, is it? With the time lapse, however; we get to cram an hour into 2 and a half minutes.
What this does not show is the thorough de-dusting. The surfaces were first cleaned with a vacuum and brush attachment, and then gone over with clean cotton rags. Next were multiple light handed passes with a tack rag. Remember that if your tack rag shows dust on the surface, it means there is still a lot of dust left. Opening up the tack rag completely and lightly bunching it is the most effective usage.

The reason we wanted to do a time lapse video is that this is a rather challenging part to gloss coat all in one go. Notice using a bristle brush and a narrow roller under the transom inwhale, and then shifting to a wider roller for the larger areas. Using a brush is asking for drips and it is a challenge to keep the coating thin enough that it doesn’t drip. The heat gun helps a lot in evenly brushing out a very thin coating of epoxy. The heat gun is set on low and always kept moving and well away from the surface.

The other area where the bristle brush is used extensively is around the hardware and gussets. No matter how thin you brush your epoxy on, there will likely be drips forming below the taped off hardware. These can be picked up with the foam brush.
Notice that we start this operation by coating the holes in the transom inwhale and the bulkhead. Any drips that form from coating these holes will be picked up when the surfaces are coated.

(We cropped out  frames where nothing was happening because glue was being mixed)
Click the link to see the video or visit our Youtube channel. :)RB

http://www.youtube.com/watch?v=irLfmpK2BYQ

I have just posted a youtube video of setting up and packing up the sailing rig for the PT Eleven nesting dinghy. This is something I was supposed to do before the Christmas holidays, and, well, I forgot. The foils you see are the foils that we provide as a kit and details are on ptwatercraft.com. The sail was our first design, though this video was taken before we trimmed up the foot just a little. We have a new design that has 2 short battens instead of the full one at the top. It is sleeved on and is really easy to manage. The shorter batten allows for a looser sleeve. Since we have had requests for a sail with a zipper luff for use with a halyard, we can now use the same design with a couple of hours additional labor to offer as an alternative. Having a halyard also means altering on the mast and adds complication over the sleeved luff. The total weight of this rig is only 13 LBS.

Prices for sails are still unknown. To have them made locally, they would cost $750-800. We are currently awaiting a quote from an offshore sail maker. ..Bummer to have to go offshore but the buyer can choose local artisan sails or production sails based on what they would rather pay. Luckily for some, principle can still outweigh cost, and we can offer that choice if someone wishes.
The mast and boom are also not yet priced. I hope we will have a price idea very soon. Being a little company as we are, it is a bit of a trick to get the carbon spars wholesale in small quantity.
To view the new video, click here, http://www.youtube.com/watch?v=KP3N_qTqPEo&list=UUVkWkVo0rpJ1I3xgJjmYUFQ&index=1&feature=plcp or visit our ptwatercraft channel. Cheers and Happy New Year! :)  (changed the link for the video so I did not have to use Youtube music!)

ptwatercraft.com

It has been weeks since we posted...Russell has been building a new PT Eleven in the shop while ironing out details in the manual. I have been re editing the manual and shuffling photos and chapters around, among other things.  In between all this and packing kits, Russell crated up our show boat and we shipped it to the east coast where it has just been christened "Wheels" and launched aboard it's new mother ship, bound for the Caribbean and Pacific via Panama. We are very excited about the adventures yet to come for this boat.

Some of our brave first customers for the PT Eleven have launched into their projects and I look forward to even more posts soon on the PT Eleven Builder's blogspot created just for this purpose.

It was brought to my attention that I had not posted about the current feature in Wooden Boat Magazine's 2012 issue of "Small Boats"!  It is a great article by Tom Jackson who came out just before the Boat festival and took the boat out for a "test drive". If you have not checked it out yet, please do! It should be at your local news stand or here online: "2012 Small Boats"

ptwatercraft.com
Check out this latest issue

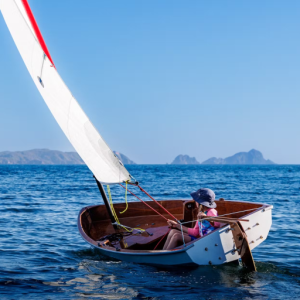
On a recent cold day, we drove the PT Eleven over to Mystery Bay and sailed it up into the next bay about a mile to our boat, Jzerro. The seagulls had made a real mess on deck and we had some general maintenance to do. On our sail back to the launch ramp, we remembered to snap a couple of pictures of the "Self steering" on the PT Eleven nesting dinghy... The hiking stick is cut to the right length, and tucks into the transom corner. It gave us a chance to warm our hands in our pockets until we tacked. :)

Also..have you seen the latest sailing video? http://www.youtube.com/watch?v=H0dMkZcmKu8&feature=player_embeddedptwatercraft.comptwatercraft.com

First and foremost, what a pleasure to meet our first builders who came to pick their kits up at our shop. I am very excited about having them build the PT Eleven and look forward to their contributions to our builder sharespot.

The process of getting a stack of kits out the door has been a lesson in economics among other things. I will write more about that soon. In the  meantime, I have put together a slide show of all the things that go into the basic PT Eleven nesting dinghy kit. We hope our current builders and those to come will agree, this is a great kit and a special little boat. That's all for now...:)

Wow, it has been way too long since I posted. Putting a pile of kits together for the first time has been quite a learning experience. The next round will be a lot easier. There are lots of different parts and we are putting together a photo album that I will post on the website soon. It is an impressive number of parts.

With some materials taking time to arrive before we can deliver the kits, Russell has been using that time to build the next boat. He is simplifying certain key parts about half way into the building process, mainly the structural fiberglass around the gussets that hold both ends of the boat together.  Since our manual is a photo manual, the only way to get the desired photos is to build a boat. Russell notes that it is a ‘hell of a lot easier to build a boat with a manual!’ than having to write the manual while figuring out how to build it. The photos below show his progress after 5 part time days. ptwatercraft.comptwatercraft.comptwatercraft.com

pteatercraft.comOn a different topic, I want to thank everyone who has been filling out our survey. Your feedback is extremely valuable to us. As developers, we are not the type to crank out new designs ‘lickety split’. As may be evident, we need our time. We have also realized that it takes 2 to 3 prototypes to get it right. While we rely on the skills of some brilliant friends for various aspects of our projects, the prototypes, photos and manual text are in Russell’s solo hands. He likes it that way but it is actually a huge job when you care as much as he does about the quality of the final result. Our designs may not meet everyone’s individual criteria but he weighs very carefully, the trade-offs inherent in achieving his design goals. So thank you again for your notes and feedback. Each new survey that comes in helps us to better understand our market and to plot the best course. :)

I walked into the shop yesterday to see stacks of PT Eleven kits! Our first run finally cut. In the process of making this boat the best it can be and still buildable even for amateurs, it turns out that there are 5 different thicknesses of ply wood and some parts are cut in 3D, such as the stems. ( pictured fanned out..Russell did that.. :) )

It brings to point why building the PT 11 from plans would not be practical. The boat is mostly from 6mm plywood but there are various parts from 12mm, 15mm, 18mm and 24mm. Nobody would want to buy a whole sheet of each of those just to use a small part of them. There would be some costly waste involved. I do not want to say that there will never be plans or patterns for our kits but I should say that our priority is to get a line of our dinghies available as kits first and foremost.  We have a few years of work on our our agenda to accomplish just that.

The first run of kits will answer many questions. The pictured stacks represent several base kits currently on order. There are lots of other things that will go into the boxes before delivery. It is a bit of an adrenalin rush and as more things arrive, and the boxes get packed, we will start breathing again and be able to review lessons learned.  :)

ptwatercraft.comptwatercraft.comptwatercraft.comptwatercraft.com

For those choosing to make their PT Eleven with the sailing option, we created a watertight cap for the dagger board trunk.
We chose G10 - Garolite in order to have a strong and stiff cap that would be as thin as possible (1/8th inch) so we could keep the profile very low and still be water tight. The dagger board trunk opening is close to the seat and the rower would actually sit over it with 2  people in the boat. Also, having a good lid is important if you would want to tow the boat.

The optional kit consists of a machined G10 Garolite cap with gasket groove & stiffener groove, gasket, mahogany stiffener, machined Garolite spacers,  plastic washer, plastic tether washer, tether string, turn-dogs,  and fasteners.

ptwatercraft.com
PT 11 Daggerboard Cap kit

Below you can see the cap installed.

ptwatercraft.com
Installed Dagger Board Cap

When sailing with the dagger board down, the turn-dogs also serve to keep the board down by resistance on the aft end and looping the string over the forward one. :)

I finally pieced together some clips of our brief sailing opportunity in the San Juans. The breeze just did not want to pick up but it was still a lot of fun. The video is on our video's page and on our ptwatercraft channel: http://www.youtube.com/watch?v=vXVLKDag95Q&feature=player_profilepage

One of these days we will have a waterproof camera and by then I might be a little better at taking video! Cheers..