About

PT Watercraft designs dinghies that are efficient, functional, modern, and attractive—available as kits you can build yourself. We also carry small boat parts and instructional books.

Quick Links

Connect

Explore

By Category

By Date

Category: Instructional Clear

Production notes

Growing Pains

Things have come a long way since we first started producing kits. We have put a lot of effort into making production more efficient and timely. The current kits contain parts that require less fitting and fiddling. We have refined the kit, and the manual.
One thing we have maintained is the stance that a really good nesting dinghy is a complex boat and the PT 11 is a really good nesting dinghy. In order to offer it as a kit that even an amateur can build, we have had to take the idea of ‘kit’ to a new level. Some have asked why  our kits are more expensive than the average kit boat of comparable size. Others who have bought and built our kits have said that we do not charge nearly enough.  Their praise has been high for the content, instructions, accuracy, attention to detail, and overall quality of the kit and resulting boat. While kits are not exactly flying out the door in mass quantities and we are not getting rich, we are not complaining. We stand by our custom products and personalized service, and we feel that we have a special family of PT11 and PT Skiff owners, who have expressed great pleasure in both building and using their boats.

ptwatercraft.com
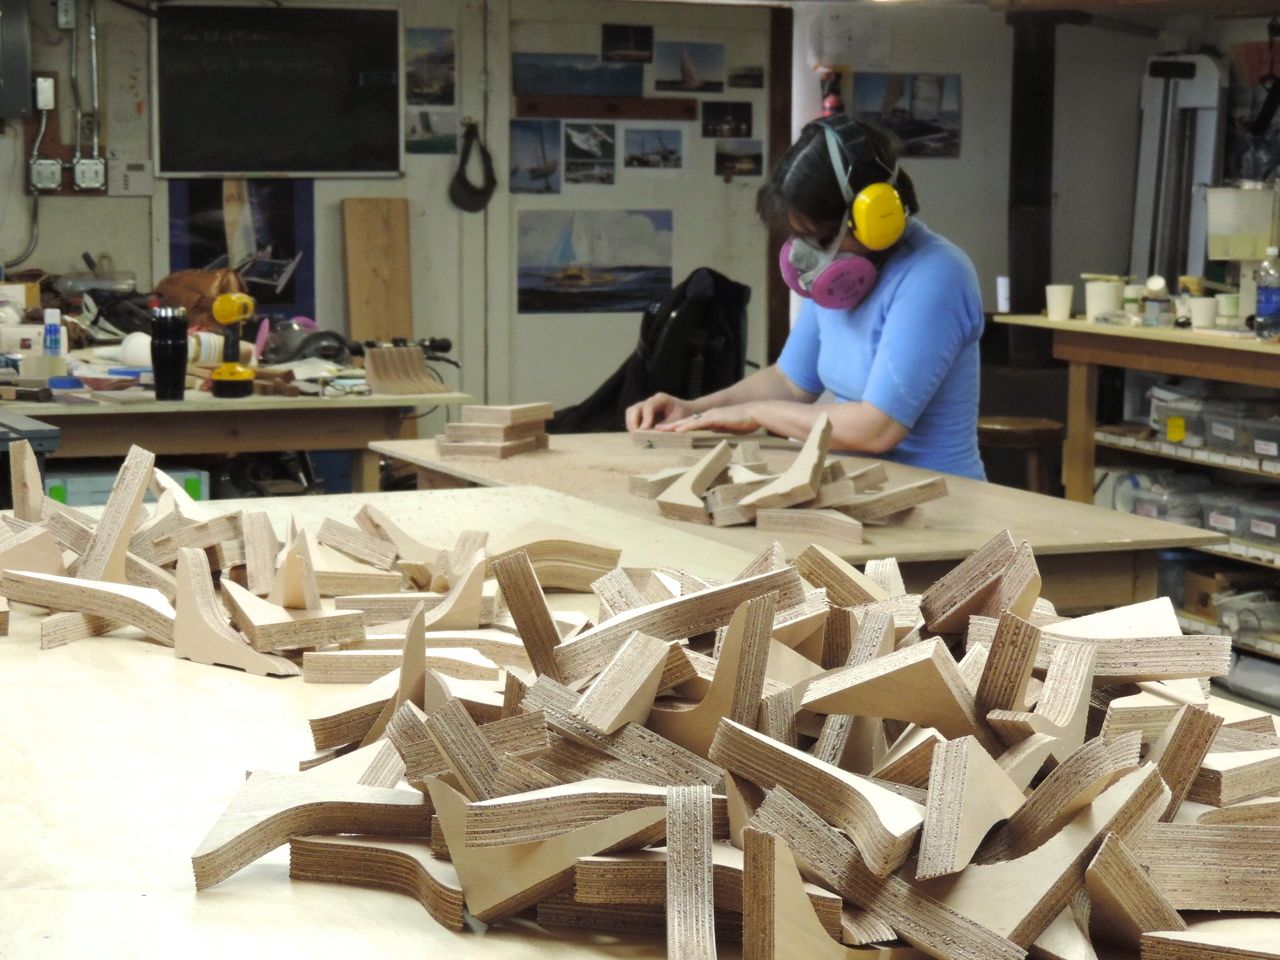
-cutting apart and pre-routering gussets for the PT 11

Not all feedback is praise….

…given the fact that we have forgotten to pack a part on occasion. This featured comment, in all it’s sarcastic humor, is a prime example…

“I found a small glitch in your packing.  Nothing major: the installation of the dagger board cover calls for two washers (under the dogs, I think).  Without them the dogs are too low with the gasket in place….  Through an outrageous and abject failure in your quality control, none were included.  😉
I know I can source nylon washers locally, even though that will put me far over budget.  I thought I’d touch base and ask about specs: is there anything special other than serving as a spacer and friction control for these washers?  Are any of the dimensions particularly important?  Are you going to spank Russell? ” J.W. June 2014.

On the flip side, builders take heed..

“man’s best friend” has been known to find kit parts to be yummy chew toys. Keeping parts in your crate with the lid on until needed keeps out both excess dust and curious ‘Fido’. I know it is nice to have company in the shop but there are lots of bite sized bits in our kits. We use a detailed packing list when filling the crates and if we checked it off, we put it in. (granted, sleep deprivation can interfere from time to time..) In most cases, we will replace lost pieces free of charge so do let us know if it just cannot be found..(along with a photo of your orderly shop space!…just kidding… 😉 Seriously though, there are a lot of small parts in our kits that need to be kept together in a safe container and we  know of at least one 5 axis shaped inner stem that was definitely lost to the shop dog.

Nesting, Nester, Nestable..

The PT 11 is known as a “nesting dinghy” and while many people know what that means, many again, do not. It is easy to explain that the boat can be separated into two parts, and the bow half ‘nests’ in the aft half, making it possible to own a relatively large dinghy that will store in a relatively small space, such as, on the deck of your boat. I had assumed that the term “nesting dinghy” referred to exactly that.  In our circle of boats and dinghies, it does, but is it the right  term?

ptwatercraft.com
Not everyone gets it right away..

The internet provides lots of definitions that all begin with the base word NEST. My 4” thick Random House Dictionary of the English Language defines “nest” in the 9th definition as,”to fit or place one within another”… Or the 12th: “ to fit together or within another or one another..” This definition works until I get asked if it means that one or more of our dinghies stack well. The fact that the dinghy comes apart into two ‘nestable’ parts, is left out of the equation.  The word “nesting” is not even in this big dictionary. It is online and I kind of like this one lonley meaning for the word even if it is related only in an abstract manner ;
nesting
— adj, nesting  (ˈnɛstɪŋ)
 — n
the tendency to arrange one’s immediate surroundings, such as a work station, to create a place where one feels secure, comfortable, or in control.

I have also had people ask me about our “nester”.  Looking up the definitions for this was interesting. In my big old dictionary,  “Nestor” is the wisest and oldest of the Greeks in the Trojan War. In the urban dictionary online however, see this screen shot:

urban dictionary definition of 'nestor'
urban dictionary definition of ‘nestor’

But that is nestor with “or” and I usually get “nester” with “er”.  “Nester”  is not in my dictionary but it is online and not exactly fitting. Look at the urban dictionary definition too. This was new to me! You can be sure I will refrain from casually using the word “nester” when talking about our beautiful dinghy. 😉

internet screenshot
internet screenshot

Urban definition:

urban definition of 'nester'
urban definition of ‘nester’

I think, after this belated study on this terminology when related to the PT 11, we can settle on something closer to the following: The PT Eleven is an 11 ft,  two part dinghy with nestable parts that store in a 6ft by 4ft 2 inch by 20 inch space.

You probably know where to find more info on our PT Eleven nestable dinghy kit and if not, click HERE.

Have you seen our Youtube channel?

Thank you for following! PTW 😉
More NEST definitions. (I deleted the bird and insect references…)
nest
noun
…
4.
a snug retreat or refuge; resting place; home.
5.
an assemblage of things lying or set close together, as a series of boxes or trays, that fit within each other: a nest of tables.

verb (used with object)
8.
to settle or place (something) in or as if in a nest: to nest dishes in straw.
9.
to fit or place one within another: to nest boxes for more compact storage.
verb (used without object)
…
11.
to settle in or as if in a nest.
12.
to fit together or within another or one another: bowls that nest easily for storage.
…
Origin:
before 900; Middle English, Old English  (cognate with Dutch, German nest;  akin to Latin nīdus  nest, Old Irish net, Welsh nyth, Sanskrit nīḍa  lair) ≪ Indo-European *nizdo-  bird’s nest, equivalent to *ni  down (see nether) + *zd-,  variant of *sd-,  ablaut variant of *sed-,  v. base meaning “sit” (see sit) + *-o-  theme vowel

Related forms
nest·a·ble, adjective
nest·er, noun
nest·like, adjective
nest·y, adjective
Dictionary.com Unabridged
Based on the Random House Dictionary, © Random House, Inc. 2014.

PT11 2014 and updates

We recently finished our sixth (yes, sixth) PT 11 prototype. This was to incorporate a few design changes and re-write much of the manual in an effort to make the boat easier to build. Building this many boats can lead to some labor saving ideas and we felt that we needed to do our best to make this, “kind-of-high-tech” boat as easy to build as possible.

In the last related blog post we detailed some of the changes we have made to the boat. Everything worked well, the new manual is done, and kit parts are stacked to the ceiling and ready to fly out the door.

ptwatercraft.com
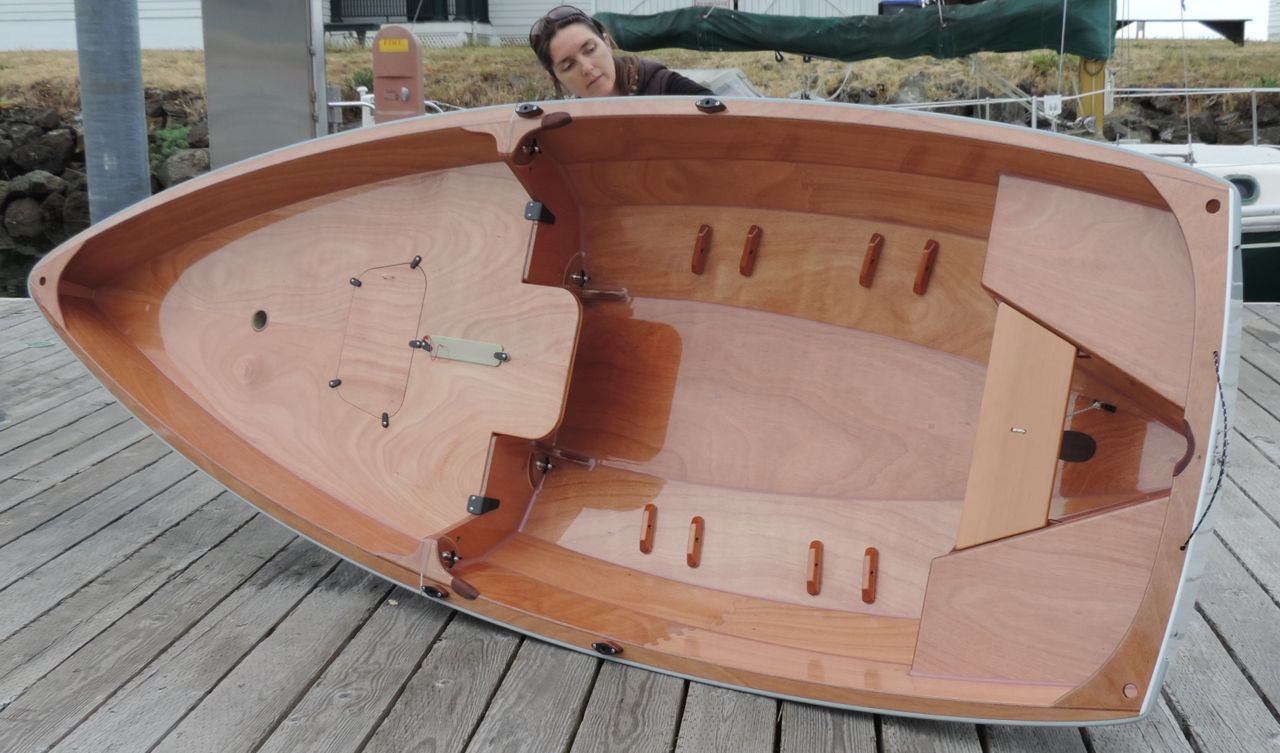
transom inwhale with bow notch allows for a more snugly nested package.

ptwatercraft.comRelevant details even if you already have a PT11;
We have a few new details to share. Most are in the new manual but could be useful for people that already have PT 11’s.
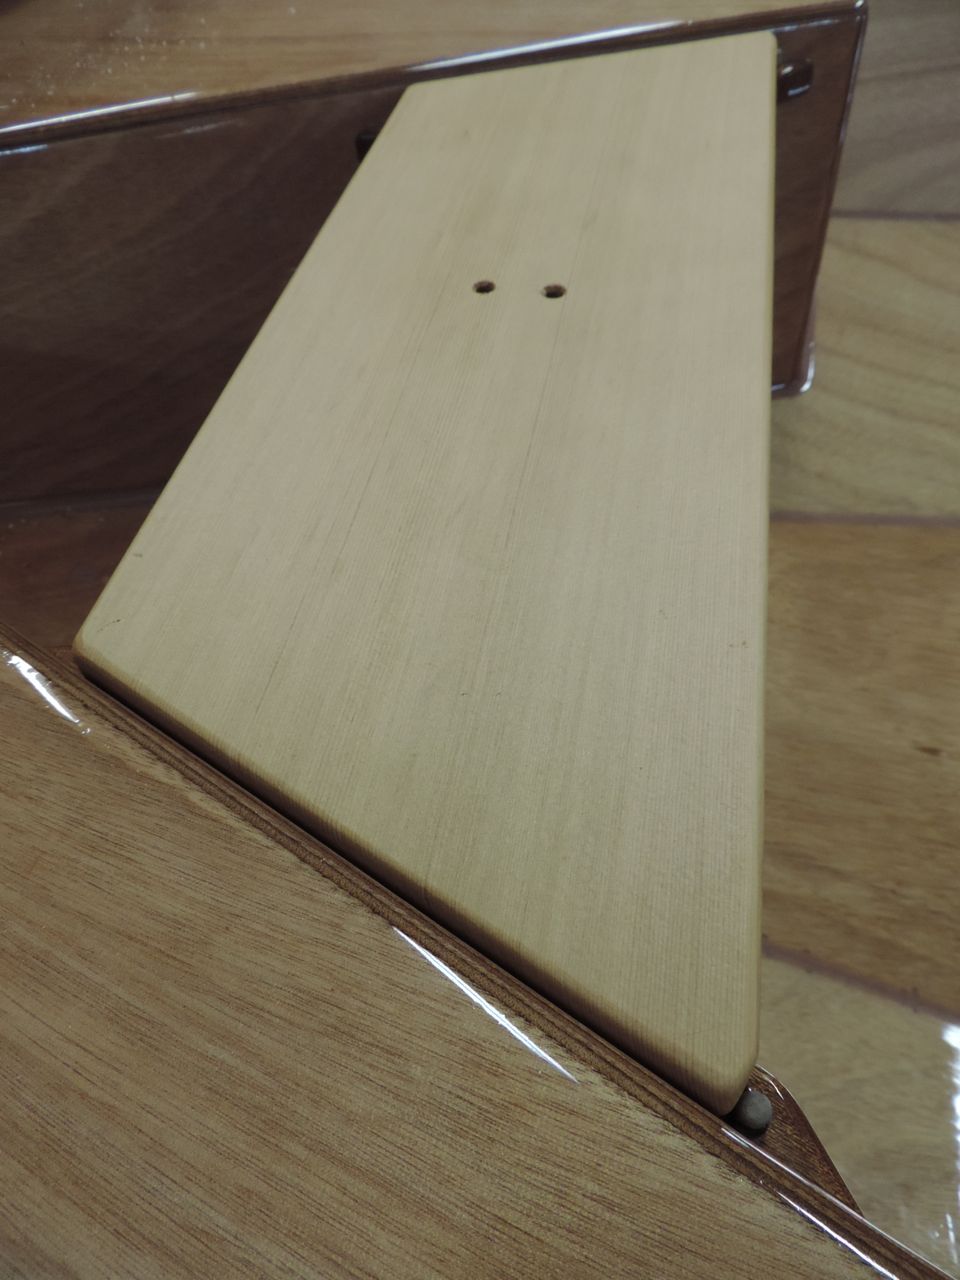
The back seat had two issues: One is that the seat needed a way to be held against the tank wall when nesting the boat. For some reason we never realized that if we trimmed 1/4” off of the aft edge of the seat (it’s now 7” wide), it could wedge between the cleat and the shock chord knot as shown below. It’s secure enough not to fall over when nesting the boat and that’s all it needs.

ptwatercraft.com
seat wedges neatly when ready to store the boat nested.

The other issue is that the back seat could slide forward, (even with the bunji cord) come off the cleats, and drop you on your butt.
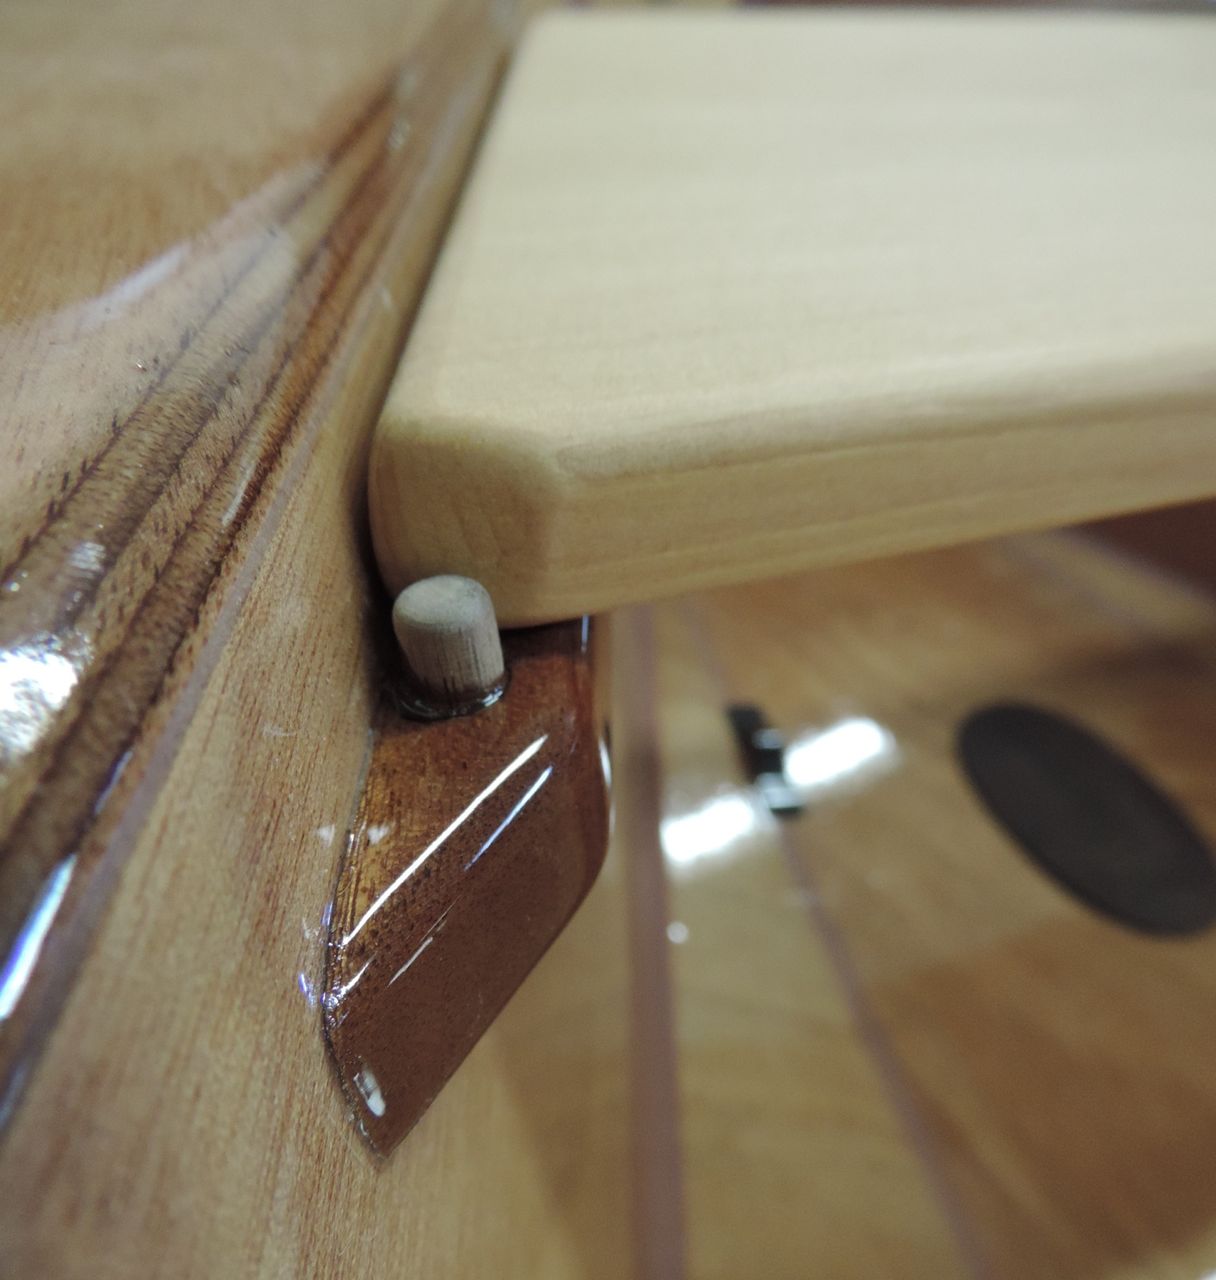
The fix is pretty simple. We trimmed a bit from the outboard edges of the seat with a sanding block (to move the seat aft) and we block sanded the forward corners of the seat as shown, all so that there was enough cleat showing to drill holes in. We then drilled 1/4” holes to a depth of 3/8” for the 5/8” long hardwood dowels to glue into.
This works well, it’s an easy fix, and if you already have a boat, we can send the dowels to you along with the handy-dandy tether washer we shown below.

ptwatercraft.com
See the dowel stopper in the bottom right corner of the photo.
ptwatercraft.com
The back seat dowel stopper prevents the seat from slipping forward.


ptwatercraft.com
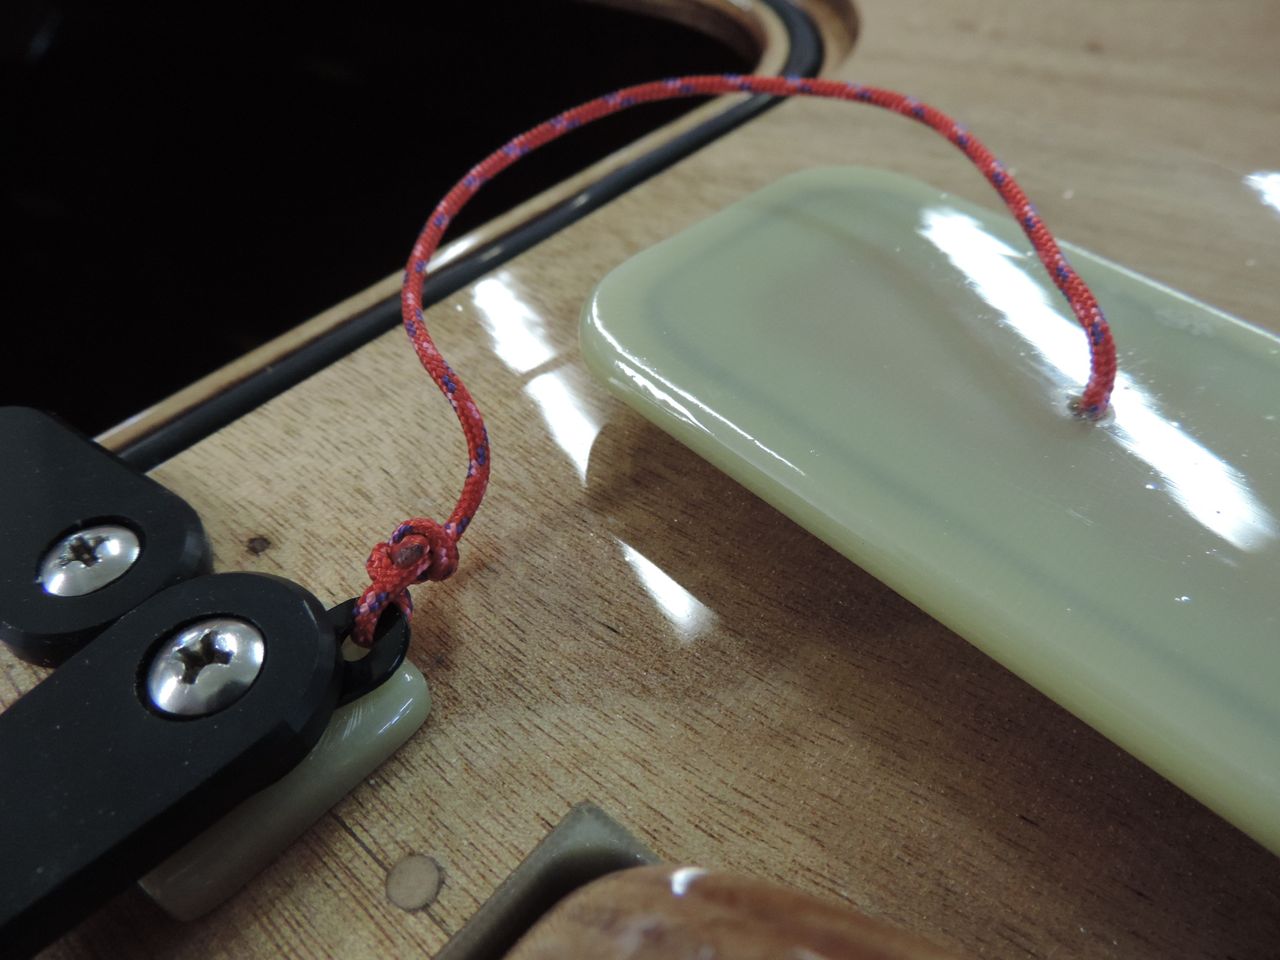
Custom machined Delrin (TM) washers with tether loop.

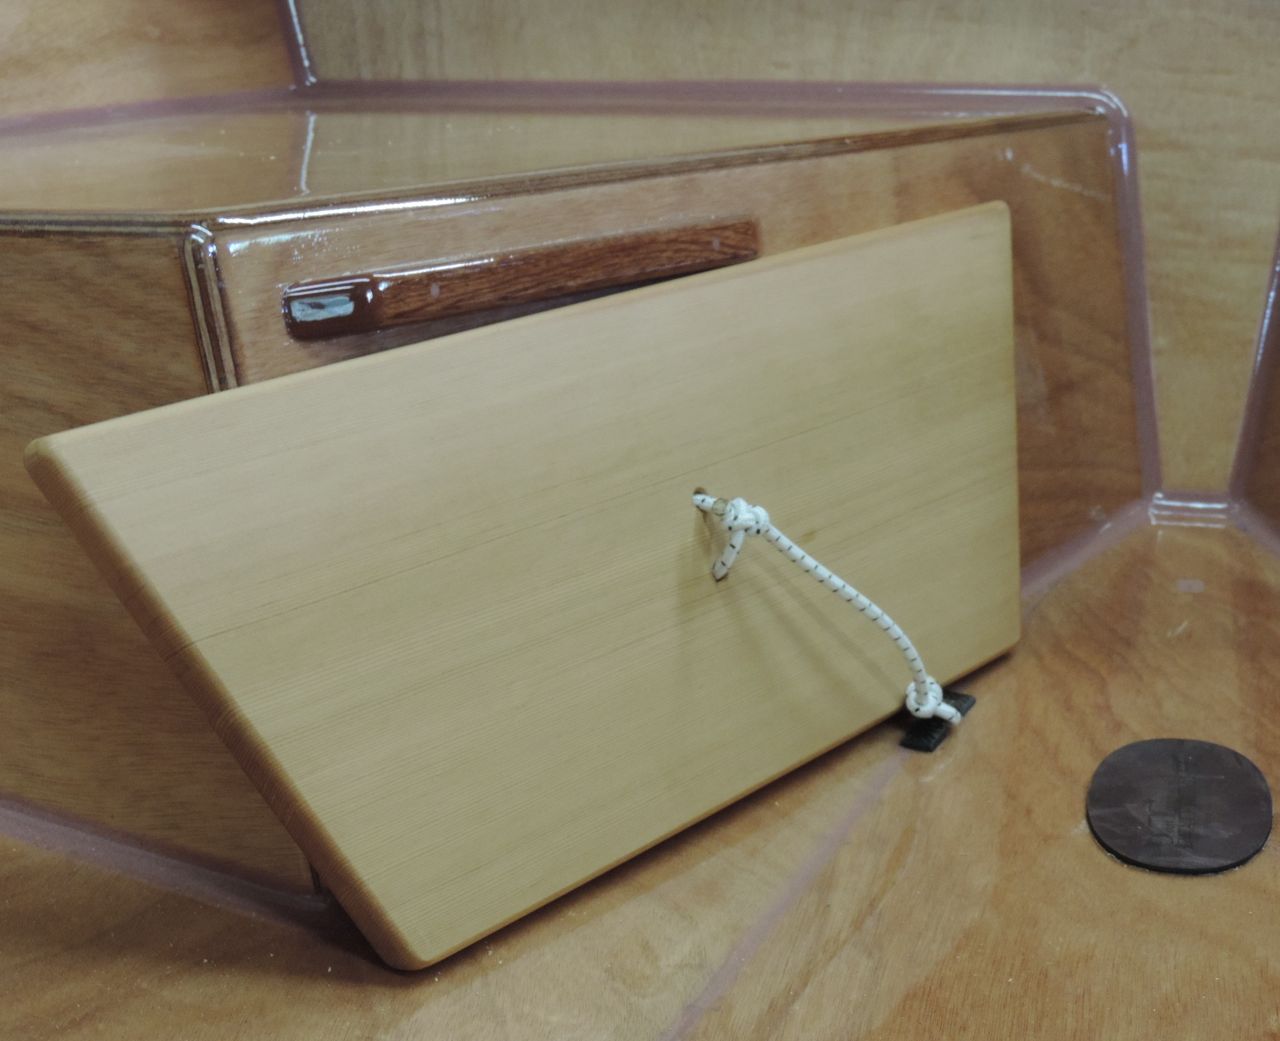
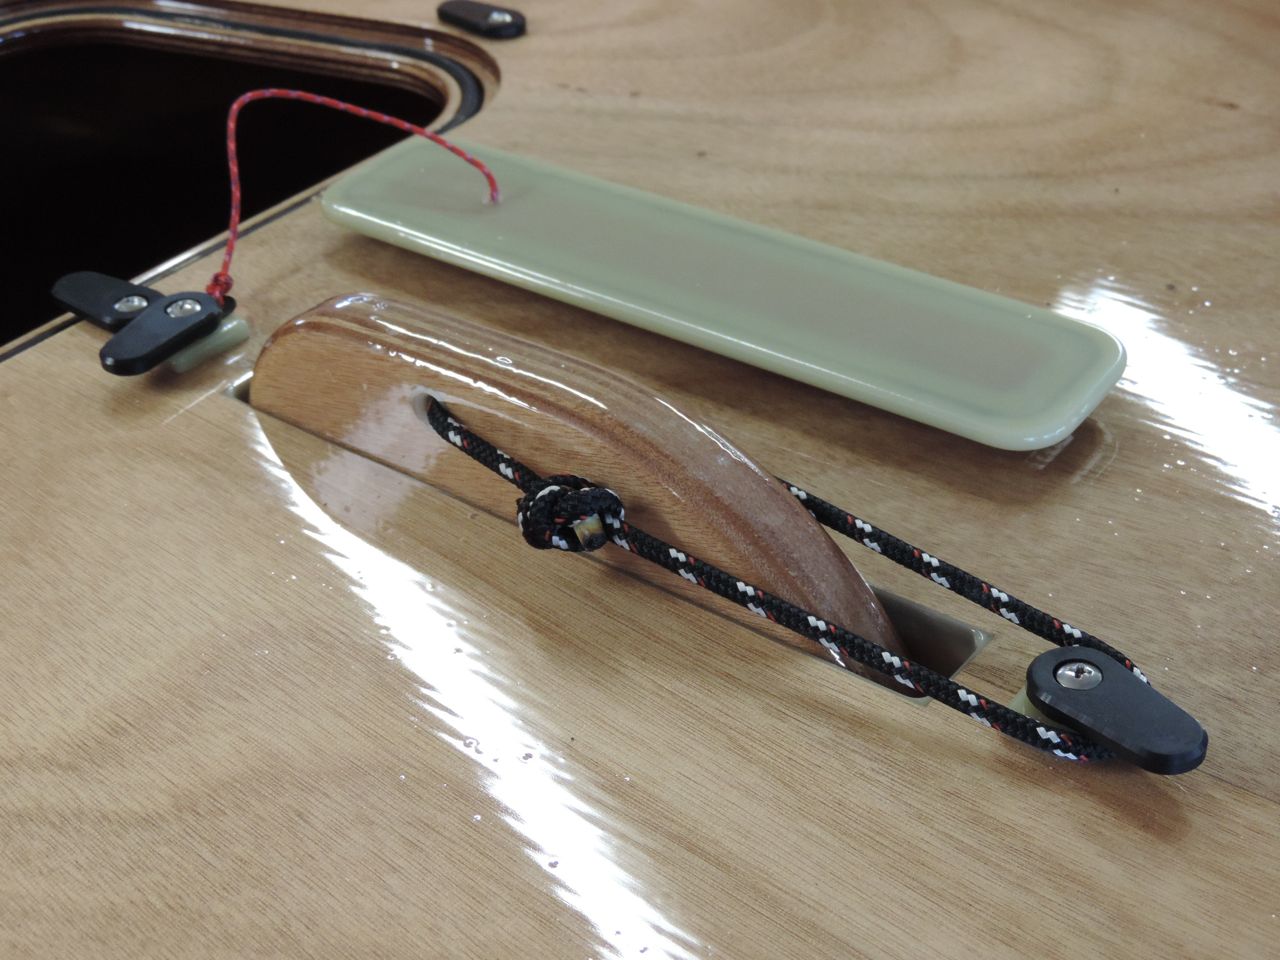
We have always kept our dagger-board trunk cap in the forward compartment, but it can be hard to find in there if it’s full of stuff. It’s easy to glue a tether into a hole drilled in the cap, but where to tie the tether? To the washer under the forward turn dog, that’s where.
It’s a special washer made for us by a neighbor who laser cuts other parts for us as well. This is a thin Delrin(TM) part, but we had a very hard time breaking one.
Replace the round washer with this one and rotate the washer aft for fishing the tether through the hole.

ptwatercraft.com
PT 11 dagger-board trunk cap with tether.

Holding the dagger-board down has always been done with a rope loop that can hook over the aft turn dog, but having the loop fairly snug (as shown below) keeps the board down all the way.

ptwatercraft.com
Having the loop the right length keeps the board down all the way.

Having the board down fully will make the boat climb like a 12 meter when sailing upwind and it will also help you run aground. No, what I meant is that it will help if you run aground.

ptwatercraft.com
-showing the dagger-board fully down at the underside of the trunk.

We hit a rock very hard and not only did it nearly throw us out of the boat, but the sharp trailing edge of the board hit the aft end of the trunk (because the board was up about four inches) and did a small amount of damage to the trunk. The dagger-board was fine, but we now sail with the dagger-board down all the way or we unhook it and let it float up (about a third of the way).

RB PTW

Test drive of the Lehr 2.5

We recently had the opportunity to test drive a Lehr outboard on the PT 11 nesting dinghy. http://golehr.com/lehr-marine/
I should say up front, that we are personally anti-outboard for this boat. The PT 11 is lightweight with a hull shape well suited for easy, near effortless rowing, even for longer distances. The sailing rig is also very easy to use. Our vision has been that this dinghy can be a tough, utilitarian, and totally enjoyable alternative to inflatables, as tenders for cruising boats.  Even so, the PT 11 can be used with a small outboard.  We have calculated that a 2HP outboard would be plenty of power to move this little boat with ease and also keeps the PT 11 within a certain USCG category.

In our opinion, however; those who expect to use a motor on their dinghy more often than not, might be better off with a different dinghy. One could choose a boat with a fuller aft end. Rowing performance would be compromised but these boats would plane with a 5HP motor.
There are, it seems, few, new model outboards of 2HP or less.  Most outboard producers currently have models of just over 2HP. Other than the perceived “need for speed” from the general public, we are not sure why they have chosen to discontinue lower HP motors. See a PT 11 test drive with an EP CARRY.
For the sake of experiment and because this motor was offered to us for this purpose, we went ahead and made a test drive.  Thank you to J.S. for this opportunity.
Here is what we found and there is a link to a short video at the the end of this post.

I. Motor: New Lehr 2.5HP propane outboard. ( 15” shaft, cost: roughly $1050)
Port Townsend Watercraft
II. Weight: We feel like this motor is quite heavy at almost 39 LBS(incl small 1 LB gas bottle)

III. Noise: Moderate.

  • Comparison:
  • On forums online, the Honda 2.3 has been proclaimed as very noisy.
  • Electric motors are obviously the most quiet.

IV. Speed: The Lehr 2.5 propelled the PT 11 with a single, 180 pound operator, at 6.8 knots, at full throttle in protected waters.

  • No comparisons at this time.

V. Trim: The PT 11 is light weight. The weight of the motor being nearly half the weight of the boat, and with a single operator having to sit far enough aft to reach the tiller, causes the bow to ride high. One would need a tiller extension to be able to shift driver weight forward.

Port Townsend Watercraft
Taking off at full throttle..

VI. Mounting: The outboard was mounted with a raw mahogany block just below the inwhale. For the purpose of this demo, we adhered it with double sided tape. For more permanent installation, we would advise exchanging the bolts on the top gudgeon, for screws that bite into the block. On the outside of the transom, we used raw mahogany strips. The block and pads are to prevent crushing or denting the hull skins when tightening the clamps.  For a motor this heavy, we recommend re enforcing the transom with vertical ribs adhering to the buoyancy tank walls and butting up to the underside of the inwhale. This would be light and effective. Port Twnsend Watercraft

Port Townsend Watercraft

VII. Conclusion: In general, if you are set on mounting a motor on the PT 11, it is preferable to choose a motor that weighs less than 30 LBS. We will be making some effort to mount and test drive the Electric Paddle in 2014.
Click here to see a short video of the PT 11 with the Lehr 2.5HP.   PTW 😉

Note: If any of our builders have tried a small outboard on your PT 11, please contact us with your experiences.

UPDATE: This information was sent to us from one of our builders in Florida. The HP used exceeds sanctioned HP for this boat but the results are informative.

“Today’s Sea Trial:  Salt water, 75 degrees, sea level, iPhone GPS.

POWER:  2.5 HP (rpm restrictor removed to increase to 3.3 hp), 1990 vintage two stroke, factory propeller, 27 pounds, Mercury outboard with tiller extension.

Life jackets, paddle, no additional gear.

Top speed, one 140 pound operator, 10 mph.  
Top speed, two people 330 pounds, 8 mph.
Top speed, four people 810 pounds, 6 mph.

Ideal cruise “sweet spot”, two people, 6 mph.

Boat exceeded all expectations. ” (Video below)


Builder modification consideration

Russell and all of our design consultants have a lot of experience with wood and epoxy boat building and a lot of thought and science went into making sure our boats are designed to be both light and strong. No boat is indestructible of course, but please consider carefully any modifications and feel free to consult us if you have concerns based on your planned use of the boat. We may not have a full time tech line but we do try to be available for customer concerns.
There are lots of ways to personalize your boat but please do not attempt to alter the structure. Also, a well built Pt 11 is a valuable boat and modifications could negatively affect resale value.

Boat building is a creative process. With our kits, it may be said the Russell has thought of ‘everything’ and thus, the margin for builder inventiveness is limited. I beg to differ and I have great faith in each person’s ability to creatively personalize their boats! It is also our hope that the building experience in itself serves the creative spirit well and the end result is a boat that makes the builder proud and happy. It is difficult to make guarantees, and especially so if any part of the design and/or the described building method, is omitted or modified.
In reference to some questions we have received ;
Flotation vs Storage;  about the PT 11: The three compartments, one in the bow and the two in the stern, are completely sealed flotation and have the same value as foam flotation in this type of boat. If access ports to flotation compartments are installed, equal foam flotation would then be required to replace the sealed air. This would be a lot of work and totally pointless. Trying to use designated flotation compartments as storage can be dangerous if the boat flips or floods. On the PT 11 & Spear, there is a large storage aft of the mast step with ample space and the PT Skiff has 3 separate storage areas. We had to calculate flotation for the PT11, the non nesting PT SPEAR, and the PT SKIFF in order to satisfy the USCG safety guidelines. It is the builder’s responsibility to abide by those rules, and, it is just plain smart.

Re-enforcements; Any additional wood or glass than what is prescribed in the manual, serves to add weight and will not necessarily make the boat any stronger than designed. Our boats are already designed with heavier glass on the bottom and solid fiberglass caps on the skegs for added toughness. If it is expected that the dinghy will be typically dragged over rough landings rather than carried, one could beef up the fiberglass on the bottom further, but it will add weight.
The transom, as designed, is strong. The rudder is a kick up rudder so there should be no chance of ripping off the transom of the boat with this rudder. If you plan to use a small outboard, (max 2HP) you would use bearing strips on the outside and clamp pads on the inside.
Builder resources; Our PT 11 family is growing. This is very exciting for us as we are a small company of just Russell and myself. Even more exciting is that our customers have been building beautiful boats! This year, 2013, we  established a registry of sorts (see the map) as an owner/builder resource and aim to create an interactive community. (see our Builder  Center page) The questions, comments, shared experiences of each builder are all welcome material that I will look forward to adding to the blog for others to learn from and enjoy.  Our heartfelt thanks to our customers, followers, and friends who share their opinions and enthusiasm about our products. We would not be here without you.

PTW Ashlyn

A Bailer for the PT 11

Having a bailer in a dinghy is a very important thing. Dinghy sailing in gusty wind can get wet, especially if the captain is not paying attention and dips the rail. Russell came up with a handy bailer idea. ptwatercraft.comThis oblong fabric softener bottle offers both a wide mouth scoop and a low profile that fits neatly below the seat tongue. Stashed inside for minor spray is a sponge. This green sponge was a waste of pennies. It does little more than spread spray water. A good absorbent sponge like this PVA sponge or 3M C41 7456-T is a much better choice. I personally like these pop-up sponges but they do not hold up well if left outside, which is kind of the point environmentally.. 😉 DSC09645This bailer installation does not interfere with nesting. There is room to spare. We used carbon glue on eyestraps and a bungee cord to keep the bailer stored out of the way but within quick reach.

If you capsize, sweeping the water out with your arm or sloshing out the water before getting back in gets most water out. See it all on this video.  PTW 🙂 PT Watercraft website


Oar Kits; carbon/foam blades

Experiment 2012 to create a kit for oars: High density foam and carbon fiber blades. Unfortunately, these kits would end up being very expensive as they require a lot of time and effort on the part of Russell. With all that he has to keep up with, this kit would not make sense for us. We have decided to leave oars to oar makers but thought you might find these pictures interesting. Please see our oars links page for oar resources. Do you know of oars that you really like? please let me know so I can add a link to the links list! Thank you.

ptwatercraft.com1

ptwatercraft.com2

ptwatercraft.com3

ptwatercraft.com4

ptwatercraft.com5

ptwatercraft.com6

ptwatercraft.com7; finished oars. solid epoxy edges. Douglas fir shafts.

Would you like to make your own oar blades and small hardware? Russell has published an e-book /book about working with epoxy. More detailed topics are on the agenda for future publication.  Have you seen our e-books/books page?

PTW website

PT 11 Capsize video

The water is cold here. The idea of jumping into it takes some courage so this video has been put off for way too long.  Russell actually did about 8 capsizes while I happily recorded them….or so I thought. In sunlight I could not see if I was recording or not and guess what… I had some nice video of my feet, and Russell getting ready to capsize.. I had to ask him to do it all again and by this time he was pretty chilled with teeth chattering and all. Well, he persevered and I got in there afterwards so that he would not be the only one to freeze, and because I had never done it before! It was much easier than I thought it would be. Lucky me had a wet suit but the initial shock of the cold water was not wasted on me even through the wetsuit. So the footage we got was limited but hopefully fun and informative. If for some reason you cannot view it, please let me know.  I did use some music that may cause it to block. If that happens, I will have to change the tunes.. PTW 😉

PT11 Capsize video

Epoxy E-book

Advance your epoxy skills and waste less, sand less, and achieve beautiful results. Russell’s many years of experience have taught him more than a few valuable techniques.  This full color 40 page e-book covers the basics of gluing, filleting, glassing, and coating. You can check it out Here.  We also have an affiliate program set up if you would like to carry this handy book on your website.  EpoxyBasicsCoverThumb


USCG’s ‘Pool of Truth’

This article was written a while ago and somehow lost on my computer. When a recent wooden boat discussion showed up about flotation in boats, an intense search prompted by Russell’s certainty that I had written on the subject, turned up the ‘untitled’, and thus, ‘lost’, document. So here it is.

The USCG’s “Pool of Truth”
Testing the PT SKIFF  (Ashlyn E. Brown)

In June of 2010, Russell and I embarked on a cross country road trip. We would not have done this except for 2 compelling reasons: an invitation to the Woodenboat Show in Mystic, CT and the chance to have the PT Skiff tested by the USCG.

The USCG has regulations for various classes of boats, and contrary to common belief, kit boat companies have the responsibility of providing a product that, built as designed, will pass federal requirements.

The PT Skiff falls under the category of “under 20ft outboard powered motorboats”. The rules for this category are particularly stringent due to a higher number of fatalities on record occurring on boats in this class. With ski boats and other high speed recreational boats under 20ft, this is not really surprising. So they have devised a method for testing motor boats under 20ft in a tank with 2 careful procedures.

First, the USCG wants to be sure that the rated capacity and HP of a boat are acceptable. To physically check this, they load a boat with 5 times it’s rated capacity or until the boat is about to submerge. For the PT Skiff, the former would be 6000 LBS. The computer images below demonstrate the displacement with 6000LBS and the maximum 9000LBS before submerging. These calculations were submitted to the CG headquarters and they agreed that our capacity label of 6 persons or 800LBS, or 1200LBS persons, gear & motor, was a modest rating.

The second critical test is to show what happens when a boat is totally flooded. This is called the Flotation and Stability test. ptwatercraft.comsimulated 6000 Lbs in the PT Skiff (Image by Eric Jolley) ptwatercraft.comMaximum Capacity of 9000 LBS (Image by Eric Jolley)

We arrived at our family’s home in Virginia on June 10th and took a couple of days to recover from the long time on the road and dip the skiff into the Chesapeake. ptwatercraft.comTouring the East River of the Chesapeake in the PT Skiff. Photo Ashlyn Brown

Over the weekend, Russell removed the motor and controls in preparation for the testing. We had been talking with the gentlemen at the CG about the testing procedure. While we were not concerned about 6000 LBS being loaded into the boat, we were a bit shocked to learn the method; blocks of pig iron weighing 800LBS each, measuring 1’x 2’x 2’ loaded into the boat. Further discussion revealed that the point load would be on the 1’ x 2’ base. The man in charge promised to stop the loading if he heard any “cracking”.

Russell spent the weekend considering any possible way to spread the load.  To put this into perspective, just one of these pig iron ‘blocks’ weighs more than twice the weight of the PT Skiff and, still roughly 1.5 times the weight even with motor & controls. They would be loading 5 of these blocks and then some. The lightweight construction of the skiff could get very stressed with that kind of point load and even the designers were concerned.  What about  smaller blocks or sand bags? we asked, or Water bags? We would cover the cost, we offered. No. They had their method and at this time, they were not set up to do it any other way.ptwatercraft.com800 LB, 1ft x 2ft x 2ft blocks. Photo; Ashlyn Brown

On the appointed day, with some trepidation, we drove to Solomon’s, Maryland where the one and only USCG testing facility is located, somewhat incognito, in an unmarked warehouse. We were greeted by a team of 3 middle aged men who scrutinized the boat on the trailer while we discussed our options. It was at this time that we learned that the capacity ratings had been accepted by headquarters so that the load test, while recommended, was totally optional.
On the one hand, we badly wanted to prove the boat and the method of build as capable of point loads such as this. On the other hand, if it did go ‘pop’, we would not have a boat for the boat show a week later, and this was most definitely, the only time we would be on the east coast with it.  Had the test been scheduled after the show, things would have looked different, but that was not the case. We were told that we could later make our own (albeit ‘unofficial’) load test that would verify the calculations.

The flotation and stability test remained and once the decision was made, our hosts relaxed and invited us to return at a given time to observe the test.
When we got back, they had the boat in the slings inside the building and were weighing it; 388 LBS.ptwatercraft.com

The PT Skiff weighed and ready for the “pool”. Photo; Ashlyn Brown

Next, a basket with lead weights was mounted on the transom to match the weight of the 25HP and other weights under the console and driver seat to simulate batteries etc.
They lowered the boat into the tank, which was a swimming pool measuring about 22ft x 10ft. All air voids were opened. In most boats, they have to drill holes but our air voids all have deck plate access. Hoses filled these areas first. The slings were then totally removed and the water continued to rise until it broached the back seat and ran out the scuppers. At this point, our host, demonstrated with red food coloring, the outflow from the scuppers and declared that the boat would not hold more water.
Now the boat had to ‘sleep’ flooded for 18 hours before the rest of the test could be done. We could come back early the next morning.ptwatercraft.com

PT Skiff totally flooded and floating level. Photo; Ashlyn Brownptwatercraft.com

Food coloring to show outflow of water. Photo; Ashlyn Brown

We walked from our hotel, across the little inconspicuous  bridge that proves this is an island and followed the singular street to it’s end where it loops back. The place definitely had an island feel to it with full marinas, lots of tourists, a big waterfront boardwalk, colonial style buildings housing stores with tropical patterned clothes, a Kontiki bar and plenty of restaurants. Russell had been testing the vanilla ice cream across country and here was no exception. We sat in the shade of a little umbrella and gave our critiques on his ice cream cone and my smoothie. It was very hot but it had been since we crossed Wyoming. The Chesapeake can boast a particular kind of hot that once experienced, is not to be forgotten in a lifetime by one’s sub-conscious senses.

We also strolled through the maritime museum and admired it’s collection of old local skiffs and fishing boats, long and narrow things of linear beauty that understood efficiency once upon a time.

We ended the day by having dinner at the Catamaran restaurant since they had an outdoor balcony. From there we could watch the sunset while idly eaves-dropping on a group of locals discussing, what else but, sex, parties, and politics. With the thick summer heat, the mellow southern drawl, and the chain smoking, our north west home felt far away indeed.ptwatercraft

Sunset in Solomons, MD  Photo; Ashlyn Brown

We arrived at the testing facility by 7:30 AM and the crew was already at work adding water to the flooded skiff just to be sure she was properly topped off.  The sling was put back on to support the boat while Steve carefully stepped into the boat and placed carefully calculated weights in prescribed locations to simulate the presence of people. They explained that they would move the weight around as if the passengers were to one side or the other, simulating a ‘worst case scenario’, and then measure the list of the boat with the slings removed. For outboard propelled boats, they should float fairly level with a maximum list is 30 degrees. In contrast, for boats with inboard motors, stability is not key but they do have to have some part of the boat above water in order to pass. This could be no more than the tip of the bow. No amount of explanation of this could make sense to me but those were the rules.
While I’m not the most technically minded person, Steve was a very good teacher and he explained every step and the concept behind it. He and his crew worked patiently and systematically as they recorded data, took pictures, worked with the electric winches, passed weights back and forth and stepped up to the waist in cold water. These guys had a good sense of humor but they also took their job very seriously and worked together like a well oiled machine.
By the end of the test, the PT Skiff listed a maximum of 11 degrees and all had gone extremely well.ptwatercraft.comFilling the boat with water. Photo; Ashlyn Brownptwatercraft.comStarboard maximum list. Photo; Ashlyn Brown

We picked the skiff up a couple hours later after they had pumped it dry and loaded it back onto the trailer. Steve explained the report he would prepare and best of all, calculated our mileage from Port Townsend and typed up a bill in our name. That’s right. Volunteering to have a boat tested is a paid deal and we got our check about 2 months later. Why do they pay you? Simple. It is cheaper than buying a boat. When new boats get red-flagged or there is any suspicion that it might not pass, these gentlemen buy it incognito and test it. If the boat fails, the manufacturer receives notice that it must recall all boats of this model at their own expense. Usually if the USCG goes to the trouble of buying a boat, there is already a probability that it will fail the test and there were enough boats in their shed to show that some do indeed fail.
A strong reason for re-designing the PT Skiff with side decks, in contrast to the first prototype, was to get the flotation up high; under the side decks and front deck as well as under the back seat. This not only provides better flotation when flooded but gives it the stability demonstrated by the test. Obviously, every boat could encounter conditions that outwit any controlled imitation but these tests show that the designers have taken the rules seriously and applied important safety factors into the design.PT Skiff on display at the Woodenboat Show in Mystic CT, 2010
Photo; Russell Brown

A final note; my explanation here is how I have understood the process and the reasoning behind it. Further “official” information can be found on the USCG website here (pages 16-18 specifically about flotation):
http://files.dnr.state.mn.us/education_safety/safety/boatwater/backyardboatbuilders.pdf
Or see the USCG website where there is lots of information.
http://www.uscgboating.org/regulations/boatbuilder_s_handbook/flotation_part1_f.aspx