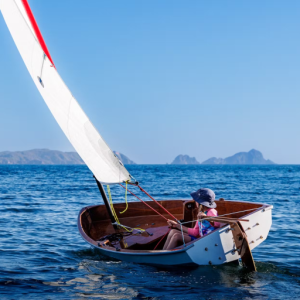
We are please to report that the NW School of Wooden Boat Building is building a PT Eleven nesting dinghy as part of their contemporary boat building program. It is being built in their newly built, on campus facility, the Jeff Hammond building, especially designed to serve as a workshop for larger projects. The boat school students are working the Sliver project; a 62foot, Bob Perry designed super sleek, day sailor. Take note that the first photo is taken with an extremely wide angle lens. The boat in the background really is 62ft long.
The PT Eleven is being built along side the Sliver project. When completed, it will be for sale. If anyone is interested in purchasing a completed PT Eleven, they should contact Bruce Blatchley at the school. (see above NWSWB link) Russell says they are doing a really clean job so far. 


Category: Nesting-PT11 Construction
Clear
A Bumper for the PT Eleven
A good bumper for the PT 11 has been a priority since the beginning.
We have seen lots of different dinghy bumpers over the years, lots of them falling off or the rails falling off because of all the fasteners used to hold the bumper on.
We know that bumpers on dinghies are a challenge and we have tried different types; the favorite being 3/4” braided nylon rope glued into a notch on the outside of the gunwale. This bumper but was very hard and probably quite heavy when wet, but it lasted over 20 years, and never came un-glued.
The gunwale on the PT11 (as well as the rest of the boat) has to be sealed against moisture intrusion for longevity, so installing a bumper with fasteners is out of the question, unless you are willing to replace the gunwale periodically.
The most highly recommended dinghy bumper is a round closed cell foam covered with a fire hose like canvass material. This is usually attached with hundreds (I’m not kidding) of screws or ring nails, but could be glued on. See following photo.
 The challenges with this bumper are:
1.How to finish at the ends. It can’t just be cut as the foam would be exposed and the canvass will fray. Usually the foam is cut short and the canvass folded over and sewn, but in a nesting dinghy this would have to be done at all 4 bumper ends at the joint between the hull halves as well as at the transom and would likely need fasteners at these points.
2. it adds to the overall width of the boat.
3. it would be difficult to install straight and clean and may not look so hot.
4. it would be very heavy when wet. … Oh, and it’s very expensive..(nearly $10/ft)
All the above is to explain how we arrived at the glue-on extruded rubber bumper.
We originally were planning a C-shaped section that would glue over the outer edge of the gunwale, but it would have to be glued on with something other than a contact adhesive and there would be challenges at the stem, transom, and in fitting around the oarlock riser blocks.
Thus we came to keeping the outer edges of the gunwale square and gluing a custom extruded bumper to the 1” wide flat present on the outer edge.
The bumper shown in the following photos was designed by us for the PT 11 and made by a manufacturer who makes rubber bumpers (chafe guards) for inflatables.
These bumpers are made from non-marking compounds and can be glued on with Hypalon glue, the same glue used to attach this type of rubber to inflatables.
Gluing this bumper on to a PT 11 is a bit of a process. The hypalon glue is two-part, stinky, and must be applied in a dry area. Being a contact adhesive, no clamping pressure is needed, but you only get one chance to put the bumper on straight.
Repairing sections of this bumper would be quite easy and could be done with a one-part contact adhesive.
The die used to make our bumper will be modified slightly and another prototype made before we order the huge quantity necessary for a minimum order.
An instruction booklet will be included with the bumper kits.
PHOTOS


Visit ptwatercraft.com or,
Contact us for more info..
Time lapse experiment of Gloss Coating
This is my first experiment with time lapse photography and I am not altogether pleased. The gloss coat came out great but, time lapse isn’t like video, is it? With the time lapse, however; we get to cram an hour into 2 and a half minutes.
What this does not show is the thorough de-dusting. The surfaces were first cleaned with a vacuum and brush attachment, and then gone over with clean cotton rags. Next were multiple light handed passes with a tack rag. Remember that if your tack rag shows dust on the surface, it means there is still a lot of dust left. Opening up the tack rag completely and lightly bunching it is the most effective usage.
The reason we wanted to do a time lapse video is that this is a rather challenging part to gloss coat all in one go. Notice using a bristle brush and a narrow roller under the transom inwhale, and then shifting to a wider roller for the larger areas. Using a brush is asking for drips and it is a challenge to keep the coating thin enough that it doesn’t drip. The heat gun helps a lot in evenly brushing out a very thin coating of epoxy. The heat gun is set on low and always kept moving and well away from the surface.
The other area where the bristle brush is used extensively is around the hardware and gussets. No matter how thin you brush your epoxy on, there will likely be drips forming below the taped off hardware. These can be picked up with the foam brush.
Notice that we start this operation by coating the holes in the transom inwhale and the bulkhead. Any drips that form from coating these holes will be picked up when the surfaces are coated.
(We cropped out frames where nothing was happening because glue was being mixed)
Click the link to see the video or visit our Youtube channel. :)RB
PT Eleven kit contents
First and foremost, what a pleasure to meet our first builders who came to pick their kits up at our shop. I am very excited about having them build the PT Eleven and look forward to their contributions to our builder sharespot.
The process of getting a stack of kits out the door has been a lesson in economics among other things. I will write more about that soon. In the meantime, I have put together a slide show of all the things that go into the basic PT Eleven nesting dinghy kit. We hope our current builders and those to come will agree, this is a great kit and a special little boat. That’s all for now…:)
PT11 Kit development
Wow, it has been way too long since I posted. Putting a pile of kits together for the first time has been quite a learning experience. The next round will be a lot easier. There are lots of different parts and we are putting together a photo album that I will post on the website soon. It is an impressive number of parts.
With some materials taking time to arrive before we can deliver the kits, Russell has been using that time to build the next boat. He is simplifying certain key parts about half way into the building process, mainly the structural fiberglass around the gussets that hold both ends of the boat together. Since our manual is a photo manual, the only way to get the desired photos is to build a boat. Russell notes that it is a ‘hell of a lot easier to build a boat with a manual!’ than having to write the manual while figuring out how to build it. The photos below show his progress after 5 part time days. 

 On a different topic, I want to thank everyone who has been filling out our survey. Your feedback is extremely valuable to us. As developers, we are not the type to crank out new designs ‘lickety split’. As may be evident, we need our time. We have also realized that it takes 2 to 3 prototypes to get it right. While we rely on the skills of some brilliant friends for various aspects of our projects, the prototypes, photos and manual text are in Russell’s solo hands. He likes it that way but it is actually a huge job when you care as much as he does about the quality of the final result. Our designs may not meet everyone’s individual criteria but he weighs very carefully, the trade-offs inherent in achieving his design goals. So thank you again for your notes and feedback. Each new survey that comes in helps us to better understand our market and to plot the best course. 🙂

Stacks of kits
I walked into the shop yesterday to see stacks of PT Eleven kits! Our first run finally cut. In the process of making this boat the best it can be and still buildable even for amateurs, it turns out that there are 5 different thicknesses of ply wood and some parts are cut in 3D, such as the stems. ( pictured fanned out..Russell did that.. 🙂 )
It brings to point why building the PT 11 from plans would not be practical. The boat is mostly from 6mm plywood but there are various parts from 12mm, 15mm, 18mm and 24mm. Nobody would want to buy a whole sheet of each of those just to use a small part of them. There would be some costly waste involved. I do not want to say that there will never be plans or patterns for our kits but I should say that our priority is to get a line of our dinghies available as kits first and foremost. We have a few years of work on our our agenda to accomplish just that.
The first run of kits will answer many questions. The pictured stacks represent several base kits currently on order. There are lots of other things that will go into the boxes before delivery. It is a bit of an adrenalin rush and as more things arrive, and the boxes get packed, we will start breathing again and be able to review lessons learned. 🙂


Nesting dinghy questionaire
Hello All, Before I update the blog with any news, I would like to invite everyone interested in the nesting dinghy series from PT Watercraft, to take a moment and fill out our questionnaire. Your input is our best guide for certain developmental decisions along the way. Many thanks! Click here to go to the questionnaire.
PT Eleven; oarlocks and leather pads
There are several options that we have been working on to be able to offer for this boat. I will begin posting them. Pricing will be announced on our website soon.
We are using Australian made Gaco gated oarlocks because they work beautifully and they are lightweight and also because of the reduced pin size.
The socket only requires a 5/8” hole. We plan to offer both the oarlocks, sockets and riser blocks kit as shown as an option. 


LEATHER PADS
When nested, the forward half touches the after half in four places, three of which are edges against edges. Leather pads glued on with contact cement nicely protect these edges. The leather pads that we sell have a center-line mark to help position the pads. 

PT Eleven nesting dinghy; painting the hull
Russell painted the hull with Interlux Perfection. The paint is rolled on. It is not tipped. He has figured out how to make this technique work really well and the finish is often mistaken for a spray job.
Starting with the bulkheads..


PT ELEVEN; GLOSS COATING INSIDE
here are some pictures of gloss coating the inside of the boat; 

