Sunday, March 24th was an overcast and cold day to be out on the water. Russell was not deterred. Paul Bieker's new design (the Riptide 41;"BLUE") was in the water and Russell was invited to check it out. "BLUE" is one of the most innovative racing sailboats around and sailed almost 23 knots on her very first sail. { read more about it. }
Bieker Boats design team of Paul Bieker and Eric Jolley are responsible for designing our PT Skiff, the 18.5ft fuel efficient motor skiff kit, sold by PT Watercraft. The PT Skiff, "Pika", built by J. Brandt in Seattle, was also there to compliment the gathering.
While on the dock at Shilshole Marina, a wedding party came down the dock and the bride and groom asked for a ride in the PT Skiff. Jan obliged and the smiling couple posed for photos. Russell snapped a few along side the wedding photographer. The PT Skiff has been put to work as a regatta chase boat, a marine research commuter, a phototgrapher's platform and now as a wedding prop!
Since we sold our PT Skiff,
.., we have been using our experimental tornado cat motor boat for any over water commuting. The 'Grasshopper" (as we sometimes refer to it) has many many miles on her 15hp motor. The trip from Port Townsend to Seattle takes about 2 hours and generally uses about 2 gallons of fuel. This boat was designed on the back of an envelope and it is definitely a unique boat. No, there are no plans available.. 
Russell was able to surf a cargo ship's wake for about 10 miles before the intensity of it got to him and he exited the wake. The trip from Port Townsend to Seattle and back, with favorable currents and surfing, used about 3 gallons of gas. This short video does little justice to the fun he was having.
USCG’s ‘Pool of Truth’
This article was written a while ago and somehow lost on my computer. When a recent wooden boat discussion showed up about flotation in boats, an intense search prompted by Russell's certainty that I had written on the subject, turned up the 'untitled', and thus, 'lost', document. So here it is.
The USCG’s “Pool of Truth”
Testing the PT SKIFF (Ashlyn E. Brown)
In June of 2010, Russell and I embarked on a cross country road trip. We would not have done this except for 2 compelling reasons: an invitation to the Woodenboat Show in Mystic, CT and the chance to have the PT Skiff tested by the USCG.
The USCG has regulations for various classes of boats, and contrary to common belief, kit boat companies have the responsibility of providing a product that, built as designed, will pass federal requirements.
The PT Skiff falls under the category of “under 20ft outboard powered motorboats”. The rules for this category are particularly stringent due to a higher number of fatalities on record occurring on boats in this class. With ski boats and other high speed recreational boats under 20ft, this is not really surprising. So they have devised a method for testing motor boats under 20ft in a tank with 2 careful procedures.
First, the USCG wants to be sure that the rated capacity and HP of a boat are acceptable. To physically check this, they load a boat with 5 times it’s rated capacity or until the boat is about to submerge. For the PT Skiff, the former would be 6000 LBS. The computer images below demonstrate the displacement with 6000LBS and the maximum 9000LBS before submerging. These calculations were submitted to the CG headquarters and they agreed that our capacity label of 6 persons or 800LBS, or 1200LBS persons, gear & motor, was a modest rating.
The second critical test is to show what happens when a boat is totally flooded. This is called the Flotation and Stability test.
simulated 6000 Lbs in the PT Skiff (Image by Eric Jolley)
Maximum Capacity of 9000 LBS (Image by Eric Jolley)
We arrived at our family’s home in Virginia on June 10th and took a couple of days to recover from the long time on the road and dip the skiff into the Chesapeake.
Touring the East River of the Chesapeake in the PT Skiff. Photo Ashlyn Brown
Over the weekend, Russell removed the motor and controls in preparation for the testing. We had been talking with the gentlemen at the CG about the testing procedure. While we were not concerned about 6000 LBS being loaded into the boat, we were a bit shocked to learn the method; blocks of pig iron weighing 800LBS each, measuring 1’x 2’x 2’ loaded into the boat. Further discussion revealed that the point load would be on the 1’ x 2’ base. The man in charge promised to stop the loading if he heard any “cracking”.
Russell spent the weekend considering any possible way to spread the load. To put this into perspective, just one of these pig iron ‘blocks’ weighs more than twice the weight of the PT Skiff and, still roughly 1.5 times the weight even with motor & controls. They would be loading 5 of these blocks and then some. The lightweight construction of the skiff could get very stressed with that kind of point load and even the designers were concerned. What about smaller blocks or sand bags? we asked, or Water bags? We would cover the cost, we offered. No. They had their method and at this time, they were not set up to do it any other way.
800 LB, 1ft x 2ft x 2ft blocks. Photo; Ashlyn Brown
On the appointed day, with some trepidation, we drove to Solomon’s, Maryland where the one and only USCG testing facility is located, somewhat incognito, in an unmarked warehouse. We were greeted by a team of 3 middle aged men who scrutinized the boat on the trailer while we discussed our options. It was at this time that we learned that the capacity ratings had been accepted by headquarters so that the load test, while recommended, was totally optional.
On the one hand, we badly wanted to prove the boat and the method of build as capable of point loads such as this. On the other hand, if it did go ‘pop’, we would not have a boat for the boat show a week later, and this was most definitely, the only time we would be on the east coast with it. Had the test been scheduled after the show, things would have looked different, but that was not the case. We were told that we could later make our own (albeit 'unofficial') load test that would verify the calculations.
The flotation and stability test remained and once the decision was made, our hosts relaxed and invited us to return at a given time to observe the test.
When we got back, they had the boat in the slings inside the building and were weighing it; 388 LBS.
The PT Skiff weighed and ready for the “pool”. Photo; Ashlyn Brown
Next, a basket with lead weights was mounted on the transom to match the weight of the 25HP and other weights under the console and driver seat to simulate batteries etc.
They lowered the boat into the tank, which was a swimming pool measuring about 22ft x 10ft. All air voids were opened. In most boats, they have to drill holes but our air voids all have deck plate access. Hoses filled these areas first. The slings were then totally removed and the water continued to rise until it broached the back seat and ran out the scuppers. At this point, our host, demonstrated with red food coloring, the outflow from the scuppers and declared that the boat would not hold more water.
Now the boat had to ‘sleep’ flooded for 18 hours before the rest of the test could be done. We could come back early the next morning.
PT Skiff totally flooded and floating level. Photo; Ashlyn Brown
Food coloring to show outflow of water. Photo; Ashlyn Brown
We walked from our hotel, across the little inconspicuous bridge that proves this is an island and followed the singular street to it’s end where it loops back. The place definitely had an island feel to it with full marinas, lots of tourists, a big waterfront boardwalk, colonial style buildings housing stores with tropical patterned clothes, a Kontiki bar and plenty of restaurants. Russell had been testing the vanilla ice cream across country and here was no exception. We sat in the shade of a little umbrella and gave our critiques on his ice cream cone and my smoothie. It was very hot but it had been since we crossed Wyoming. The Chesapeake can boast a particular kind of hot that once experienced, is not to be forgotten in a lifetime by one’s sub-conscious senses.
We also strolled through the maritime museum and admired it’s collection of old local skiffs and fishing boats, long and narrow things of linear beauty that understood efficiency once upon a time.
We ended the day by having dinner at the Catamaran restaurant since they had an outdoor balcony. From there we could watch the sunset while idly eaves-dropping on a group of locals discussing, what else but, sex, parties, and politics. With the thick summer heat, the mellow southern drawl, and the chain smoking, our north west home felt far away indeed.
Sunset in Solomons, MD Photo; Ashlyn Brown
We arrived at the testing facility by 7:30 AM and the crew was already at work adding water to the flooded skiff just to be sure she was properly topped off. The sling was put back on to support the boat while Steve carefully stepped into the boat and placed carefully calculated weights in prescribed locations to simulate the presence of people. They explained that they would move the weight around as if the passengers were to one side or the other, simulating a ‘worst case scenario’, and then measure the list of the boat with the slings removed. For outboard propelled boats, they should float fairly level with a maximum list is 30 degrees. In contrast, for boats with inboard motors, stability is not key but they do have to have some part of the boat above water in order to pass. This could be no more than the tip of the bow. No amount of explanation of this could make sense to me but those were the rules.
While I’m not the most technically minded person, Steve was a very good teacher and he explained every step and the concept behind it. He and his crew worked patiently and systematically as they recorded data, took pictures, worked with the electric winches, passed weights back and forth and stepped up to the waist in cold water. These guys had a good sense of humor but they also took their job very seriously and worked together like a well oiled machine.
By the end of the test, the PT Skiff listed a maximum of 11 degrees and all had gone extremely well.
Filling the boat with water. Photo; Ashlyn Brown
Starboard maximum list. Photo; Ashlyn Brown
We picked the skiff up a couple hours later after they had pumped it dry and loaded it back onto the trailer. Steve explained the report he would prepare and best of all, calculated our mileage from Port Townsend and typed up a bill in our name. That’s right. Volunteering to have a boat tested is a paid deal and we got our check about 2 months later. Why do they pay you? Simple. It is cheaper than buying a boat. When new boats get red-flagged or there is any suspicion that it might not pass, these gentlemen buy it incognito and test it. If the boat fails, the manufacturer receives notice that it must recall all boats of this model at their own expense. Usually if the USCG goes to the trouble of buying a boat, there is already a probability that it will fail the test and there were enough boats in their shed to show that some do indeed fail.
A strong reason for re-designing the PT Skiff with side decks, in contrast to the first prototype, was to get the flotation up high; under the side decks and front deck as well as under the back seat. This not only provides better flotation when flooded but gives it the stability demonstrated by the test. Obviously, every boat could encounter conditions that outwit any controlled imitation but these tests show that the designers have taken the rules seriously and applied important safety factors into the design.
PT Skiff on display at the Woodenboat Show in Mystic CT, 2010
Photo; Russell Brown
A final note; my explanation here is how I have understood the process and the reasoning behind it. Further “official” information can be found on the USCG website here (pages 16-18 specifically about flotation):
http://files.dnr.state.mn.us/education_safety/safety/boatwater/backyardboatbuilders.pdf
Or see the USCG website where there is lots of information.
http://www.uscgboating.org/regulations/boatbuilder_s_handbook/flotation_part1_f.aspx
The Spear Non-Nesting PT11 explained
THE SPEAR is identical in hull shape to the PT 11, but the interior geometry and construction are quite different and deserve explanation. The PT 11 has a full width foredeck so that water drains into the aft compartment, otherwise there would be three areas that would need bailing of rain and spray. The Spear can have scuppers through the main bulkhead (the nesting PT 11 can’t) and therefore can have what I call a “trunk” seat.
When rowing with three, the trunk seat allows more comfortable seating for the person sitting in the bow. The areas to the sides of the seat are good for holding oars and other things in the boat.
The trunk seat also keeps the hull from twisting under sailing loads. It’s like a torsion box. (Shown below are the PT11, left, and the beta prototype of the Spear)

Below photo taken in March 2013 of the prototype being built to figure out the process and to write the manual.
Two of the watertight hatch kits that we offer as options fit really well in this boat, making the boat versatile for carrying (and keeping dry) groceries, camping gear, cameras, safety gear, etc.
The aft hatch is easier to access when sailing and is great for things like cameras, jackets, and food, but because of the baffles under the back seat (more on that next), the volume of area under the forward hatch is much greater.
While the hatches are work to install, the cost of the kits is very small compared to the utility and safety they offer. They also provide access and visibility to the daggerboard trunk, mast socket, and rudder hardware, not to mention a good place to hide valuables left in the dinghy. Coast Guard regulations play a large role in the interior geometry of the PT 11 and the Spear. This may sound like big brother getting in the way of art, but it’s quite the opposite. The regulations are to protect us, the kit provider and especially you, the end user.
Buoyancy built into the right parts of the boat is necessary for safety. Sealed air voids (compartments) have the same value as flotation foam, but access ports or hatches are not allowed in sealed air voids. If the builder insists on inspection ports, it is then necessary to fill these voids completely with foam flotation in order to comply with safety standards. The Below Photo shows the boat before the deck and back seat lid are installed. 
The bow area (forward of the mast step bulkhead) is a sealed air void in the PT 11 and the Spear. The PT 11 has built in buoyancy tanks in the back of the boat on either side (outboard) that are equal to the volume in the bow. This is what the Coast Guard wants, and it makes sense.
The Spear has a large back seat area, but because it has a hatch, we have to install baffles to form sealed air voids outboard of the hatch where they would do the most good in an emergency. Though the baffles under the back seat decrease the usable volume for storage, they make us legal and make you safer, and they make for a well supported back seat.
Below; Rowing the Spear with 2
The finished boat pictured was a beta prototype built summer 2012. Due to less specialty hardware required, the Spear base kit will cost several hundred dollars less that the nesting version. The boat will be lighter by 3 - 5 pounds. The various options, including sailing rig, offered for the PT11 nesting dinghy will be the same for the Spear. As of April 2013, we are taking orders for the "SPEAR" kit.
See our website for full information. PTW:)
PT11 Watertight hatches
We have developed a simple and effective hatch that is water tight and flush with the deck. Russell has used similar systems for custom hatches on different kinds of boats.
The PT 11 foredeck hatch kit is offered as an option to the PT 11 nesting dinghy kit. Alternatively, one could use commercially produced deck plates or hatches. Some of these are not totally water tight, or are fairly heavy and, they are plastic.. Below, our hatch kit is shown with the foredeck, stringers, and glue cleats. The underside of the foredeck has a scribe mark for the hatch cut out. We often debate making this hatch a part of the base kit with the hatch opening machined already. But we are trying to keep builders' options open.
These hatches differ from their plastic counter parts in that they are actually water tight. This is achieved with the combination of a very rigid lid and coaming, the right gasket, and really slick machined Delrin turn-dogs. They are a bit of work to install and finish but the hatch kits come with a very complete photo manual and the result is an easy to use, flush, and good-looking hatch.
We also have 2 other sizes of Hatch kits designed with the SCAMP in mind.
The kits include machined high quality Okoume plywood parts, (coaming, stiffener and lid), gasket, turn-dogs, fasteners, kevlar tether, and manual.

The hatch kit you would receive includes the hatch lid, lid stiffener, coaming with the groove for the gasket machined out, machined Delrin turn-dogs, fasteners, and gasket. Shown below.
"Building the PT Eleven" describes in detail, how to install and finish the hatch. Note the tether.
The hatch is flush with the deck when finished. The turn-dogs are 3/16 inch high.
Visit ptwatercraft.com for all of our kit information.
A PT 11 Blog from Canada
One of our recent additions to the PT 11 family is in Port Alberni on Vancouver Island. He and his wife have their own blog. I recommend checking it out!
http://islandarborworks.blogspot.ca/
PT11 january 2013 video
Small craft Hatch kits
UPDATE: Port Townsend Watercraft no longer produces these hatches. We still have the instructions online HERE and for savvy DIY folks, it may be enough information to create your own. Additional tips: The lid thickness must match the cut-out thickness, the gasket notch depth is cut to .185", and the recommended gasket can be found on Mcmaster Carr:: Super soft latex tubing # 5234K96. The information below from this old post is left available in case there are any helpful details to glean for making your own.
Port Townsend Watercraft has expanded it’s line of water tight hatch kits. We have recently developed watertight hatch kits for the SCAMP from Small Craft Advisor Magazine. (see discussion at the SCA link) These are similar to the very successful water tight hatch that we use in our PT Eleven nesting dinghy. These hatches can be used on any kit boat where the dimensions allow.
Our hatches differ from their plastic counter parts in that they are actually water tight. This is achieved with the combination of a very rigid lid and coaming, the right gasket, and really slick machined Delrin turn-dogs. They are a bit of work to install and finish but the hatch kits come with a very complete photo manual and the result is an easy to use, flush, and good-looking hatch.
The kits (Used to) include the machined high quality Okoume plywood parts, (coaming, stiffener and lid), gasket, machined delrin turn-dogs, fasteners, kevlar tether, and instructions.


PT11 Foils Dimensions
Non nesting “Spear” progress
A brief update can be seen here: http://ptnestingdinghy.blogspot.com/search?q=spear
PT11 rig
(Updated)
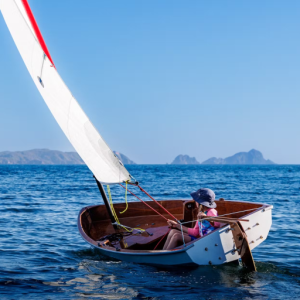
We took the sailing option very seriously for the PT 11 and it's a good thing we did. Most of the PT 11 builders have chosen our rig and foils. The sailing performance of this boat is not only measured in sailing ability, but also in simplicity and ease of setting up the rig. Setting up and breaking down a sailing rig is always a bit of work, especially if you are doing it alongside a cruising boat. It's true that the easier the set-up, the more one goes sailing. Our rig is as light and easy to use as possible. The carbon fiber mast is two-piece and sleeves together. The boom carries all of the hardware and running rigging. The gooseneck fitting is made by us. It has no moving parts, installs instantly, and is held to the mast by the sail and vang. High quality snap and "S" hooks make set-up significantly faster.
The sail is small (54 sq. ft.), but it's a powerhouse, thanks to a good sail designer, Sandy Goodall. The sails are made from DK 160 Challenge.(TM)
The PT 11 sailing rig is sold complete and ready to use.
The rig comes in its own bag shipped in an 8ft long x 7" x 7" box.
In the 94" bag: carbon mast, boom, running rigging, and 54 ft sq sail. All this weighs barely 11 pounds! Assembled, the mast is 15' 1" tall with a 10" bury. (socket on the PT 11 and Spear dinghies.
Out haul and main sheet tackle.
Line colors change with various batches.
Below: Gooseneck and vang The red part is the sleeve on the sail.
The gooseneck left was our original design that turned out to be quite labor intensive.
We have since developed a machined Delrin gooseneck, (below) glued into the boom rather than riveted and that has been working great. 
Earlier model above with an S-hook, currently below with a snap-hook.
Having fun!
Complete rig: includes a 2-part carbon mast + boom, all associated hardware and running rigging, sail and bag. It is extremely lightweight (barely 11 Lbs) and quick to set up.
Our Spar tubes are custom made in the USA + Harken, Ronstan, & Allen Hardware)
The masts and booms are made in state by ICE, a maker of the highest quality carbon fiber tubes on the planet. The two-part mast and boom (almost 23 lineal feet of tapered custom carbon tubes) weigh just 6.7 lbs and that includes all the hardware and running rigging on the boom (5 blocks, 2 snap hooks, 1 s-hook, 7 eye straps, 1 cleat, 37 feet of running rigging, and a custom gooseneck fitting.
Pricing on the CLC website
We have minimal notes for builders to create their own sailing rig as an alternative, starting with 2 standard diameter 460 windsurfer masts.
About the PT Eleven sail :
A foil shaped, luff sleeved sail with 2 short battens, app 54ftsq. (DK160) Challenge(TM) sail cloth is made in the USA. This type of sail does not reef and we have not missed such a feature. It is a single, relatively small sail well shaped for a variety of conditions. There is no jib or spinnaker.
PT 11 Sails are designed by Sandy Goodall and prototyped by Sean Rankins of NW Sails & Canvas. Production modifications by Bob Pattison of Sails International. *Production by Neil Pryde/Sails International.
Read Sandy’s Review of Sailing the PT 11.
Notes on the design; Look for ‘REEFING THE SAIL?’
In dinghy sailing events placed in the same class as Lasers, we found the PT 11 to be competitive upwind as the foils and sail allow for pointing very high. However; The PT 11 is not designed as a racing dinghy, but it is a very fun boat to sail. AEB